You can access the Documents Feature Management page by
Clicking the Features Edit  button located in the Site Management menu
column of the Main Administration menu (Ctrl-Alt-m) and then check marking the
button located in the Site Management menu
column of the Main Administration menu (Ctrl-Alt-m) and then check marking the  Documents
feature activation box and then click on the Documents
link.
Documents
feature activation box and then click on the Documents
link.
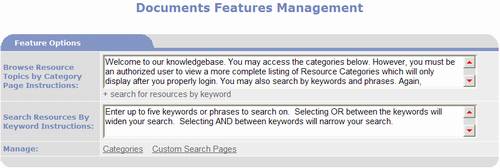
- Browse
Resource Topics by Category Page Instructions – used to define the
instructions displayed on the Browse Resources by Category page. The link Search
for resources by keyword is automatically inserted at the end
of the instructions. This link takes
the user to the Search Resources by Keyword page.
- Search
Resources By Keyword Instructions – used to define the instructions
displayed on the Search for Resources by Keywords page.
- Manage
– links to add and manage the following:
o Categories Link – click to display the Document
Categories Management page to define categories for the Resource Document
Library.
o Custom Search Pages Link - click to display the Custom Search Pages Management
page to define custom search pages.
Version Control
By enabling
Version Control on the website, users are provided the ability to:
·
Designate published version of a document.
·
Undo changes by reverting to previous version.
·
Collaborate and approve changes prior to
posting.
·
Archive and view history of document changes.
·
Approve and decline documents or versions.
·
Notify administrator of document pending
approval.
·
Command selected documents to open in a new
window.

·
Enable
Version Control Field – This field can be set to Yes or No. When set to
Yes, multiple versions of a single document may be saved.
·
Default
Version Control To Field – When individual documents are created and saved
to the website, the value of the Version Control field will be initially set to
the value selected here.
·
Enable
Auto Indexing Field - Auto Indexing
is an optional feature that may be purchased in addition to the standard
PortalProdigy license. If the feature is licensed and installed, then
enabling auto indexing allows the system to index the entire text of any DOC,
RTF, PDF, TXT, HTM, or HTML document for searching purposes. The system behaves
as if all the words composing the document were listed in the Keywords field of
the Document Management page of the corresponding document.
·
Default
Auto Indexing To Field - When individual documents are created and saved to
the website, the value of the Auto Indexing field will be initially set to the
value selected here.
Archived Documents - While
creating, modifying and collaborating on new documents, it is sometimes
desirable to have copies of each evolving document available on the website to
your team but not to the public. PortalProdigy’s Version Control feature
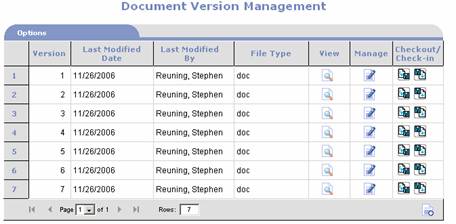
provides components to accomplish such a possibility. Using the Add New Version
Button  on the Document Management page, users can
load several versions or a document without publishing to the visitor’s
Resource Document Library. Later, administrators or other permitted users on
the team can review the Archived documents
from the Document Version Management page by clicking on the View Versions
button
on the Document Management page, users can
load several versions or a document without publishing to the visitor’s
Resource Document Library. Later, administrators or other permitted users on
the team can review the Archived documents
from the Document Version Management page by clicking on the View Versions
button  on the Document Management page.
·
Prompt
for Auto Archive? Field – You may select No to avoid an annoying prompt when you are loading large numbers
of documents. It is suggested that it always be set to Yes.
·
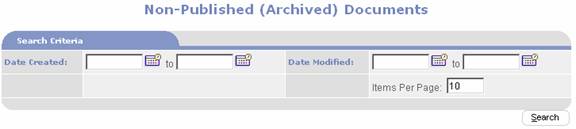
Purge Non-Published (Archived)
Documents Link – Clicking on this link accesses the Purge Non-Published (Archived) Documents search page
which is used to locate archived documents and the purge them.
§
Created Date Range Search Field –Entering
a date in the first text box only, will retrieve all Documents with Created
Date greater than or equal to the entered date.
Entering a range is inclusive of entered date values.
§
Modified Date Range Search Field – used
to search by date last modified range.
Works the same as Created Date
Range.
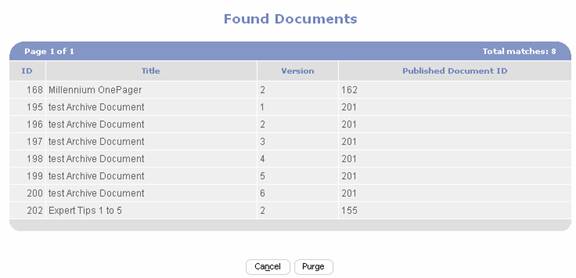
Clicking on the Purge Button  will delete all documents in this list from
the Document Library. They will be deleted PERMANENTLY and shall not be
recoverable.
will delete all documents in this list from
the Document Library. They will be deleted PERMANENTLY and shall not be
recoverable.
·
Purge Expired Documents Link
–
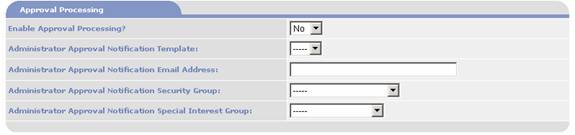
Approval Processing -
·
Enable
Approval Processing Field - This field can be set to Yes or No. If selected
to Yes, the Approval Status of the document is set to Pending as displayed in
the Approval Status field  on the Document Management page of the
affected document until approved or declined by an authorized user.
on the Document Management page of the
affected document until approved or declined by an authorized user.
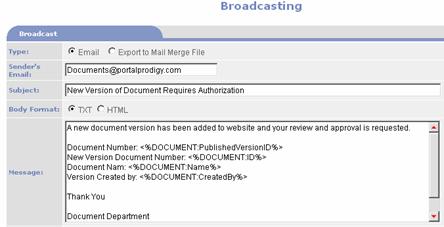
·
Administrator
Approval Notification Template Field – If the Approval Processing Field is set
to Yes and a notification letter is
selected in this field, then notices will be automatically broadcast to
individuals based on the settings in the Approval Notification Email Address,
Administrator Approval Notification Security Group and Administrator Approval
Notification Special Interest Group Fields.
At least one broadcast template for the Object Type = Document
must be created or nothing will show up in the selection list. Broadcast
templates are created by clicking on the Broadcasting Add Button  located in the Contact Management menu column
of the Administration Menu (Ctrl-Alt-m).
located in the Contact Management menu column
of the Administration Menu (Ctrl-Alt-m).
·
Administrator
Approval Notification Email Address Field – Enter an email address here if
you want approval notifications to be sent to a specific email address.
·
Administrator
Approval Notification Security Group Field – Select a security group from
the list here if you want approval notifications to be sent to members of a
specific security group.
·
Administrator
Approval Notification Special Interest Group Field - Select a special
interests group from the list here if you want approval notifications to be
sent to members of a specific special interests group.
Options:
|
Topics
|
Used to create Topic headings for organizing Resources Documents.
|
|

|
Saves the settings.
|
|

|
Print the current page (contents of your browser window)
according to your browser’s print settings.
|
|

|
Close the page discarding all entries and edits.
|
|

|
Close the page and save changes. PORTALPRODIGY will prompt to save
changes. OK response saves changes,
closes page, and returns to previous page.
CANCEL response discards all entries and edits (same as Cancel button).
|


