The first step is to create an Item record using Item
Management. If you use PORTALPRODIGY
Inventory Control then the next step is to enter the quantity on hand using
Inventory Entry. The final step is to
publish the Item (Product) in the Product Catalog.
- From the Site Administration Menu
 option, click on the
  icon.
icon.
 Note:
don’t be put off by the long scrolling Item Management page and its many
fields. The only field that requires you
to enter a value is the Product Name field. All other fields are optional.
Note:
don’t be put off by the long scrolling Item Management page and its many
fields. The only field that requires you
to enter a value is the Product Name field. All other fields are optional.
- Leave Feature field set to Products
(the default value) and Type
field set to Product (the default
value).
- Enter a unique name in the Product Name field. This is the name that will be displayed
in the Product Catalog.
- Enter the price you are selling the
product for into the Sales Price
field. This is the dollar amount
for a single unit. Use a decimal
for cents.
- If your organization offers quantity
level pricing or special pricing for selected groups of customers, you
need to configure Price Group Pricing.
For detailed instructions see the section of this chapter titled
How to Setup Customer Price Groups and Volume Pricing:
- If your organization uses part numbers
or SKUs, enter it in the Product
Code field. Although a value is
not required, if you enter one it must be unique.
- If you are offering a sales price at a
discount to the list price and want to show the comparison, enter the List Price.
- If you are using Product Types select one from the list box.
- If you want to specify the cost for
the item, enter the unit Cost
and set Costing Method to Specified Cost. If you want to use the average cost and
you have the Initial Inventory Entry enabled, then you may enter the unit Cost; otherwise, leave blank as
the Cost will be calculated by the
system each time new quantities of the Item are received in
Inventory.
- If you have setup Manufacturers select
the products Manufacturer from
the list box and optionally enter the Manufacturers
Model Number and Manufacturers
Product Code.
- Select a Unit Type from the list box.
Unit Type is displayed on the Product Details page.
- You may enter a Shipping Weight per unit of the Item. This should be entered in the same unit
of measure that is used for Shipping Rates based on Weight. Typically this is entered in pounds and
a decimal is used for ounces. You
may use another unit of measure such as Kilograms. Just be sure to be consistent and use
the same unit of measure for all Items.
- Select either Average Cost or Specified
Cost in the Costing Method
field. Currently these are the two
Costing Methods supported by PORTALPRODIGY. It is a planned enhancement to add the
following the additional costing methods:
LIFO & FIFO.
- If the Item comes in different colors
and sizes you need to separately define each color and size using the Colors and Sizes input fields.
- To add a color, first enter the name of the Color in the text box
 then click the button to add the item to the list
control
then click the button to add the item to the list
control 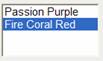 .
.
- If you want to display sample color swatches in the
Shopping Catalog then with the color highlighted in the list control,
such as “Fire Coral Red” show above, click on
 to open the color palette pop-up window
shown below.
to open the color palette pop-up window
shown below.
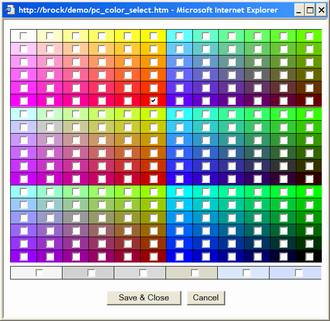
- Check the applicable color and click the
 button. Note that the display
of colors is dependent on each customers monitor, graphics chips, etc.
button. Note that the display
of colors is dependent on each customers monitor, graphics chips, etc.
- To add a size, first enter a description of the Size in the text box
 then click the button to add the item to the list
control
then click the button to add the item to the list
control  .
.
- Enter a brief plain text description of the product
in the Short Description
field. The Short Description is displayed
in the Product Catalog listings pages.
- Using either plain text or HTML enter a description
of the product in the Description 1
and Description 2 fields. Both of these are displayed on the
Product Detail page. The purpose of having two fields is to allow you to
split the description into two different locations on the Product Detail
page. E.g. you may enter a summary
description of the product in Description
1 which is displayed in the upper section of the Product Detail page
and a detailed description such as bullet points of features, ingredients,
etc. in Description 2 which is
displayed in the lower section of the Product Detail page. Use the
 HTML Editor option to create and edit the
descriptions as HTML.
HTML Editor option to create and edit the
descriptions as HTML.
- Configure the Options
section and GL Accounts. The GL Accounts default to the values
specified in Product & Inventory Features Management.
- If you have set up Vendors, complete the Purchasing section.
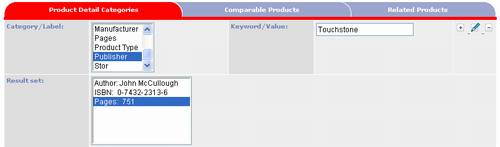
- Define Keywords using the Product Details feature.
o
Select and click on a Category / Label to
highlight it.
o
Enter the keyword or phrase into the
Keyword/Value text box.
o
Click option to add it to the Result Set.
- Repeat for each Keyword / Value.

§
If you know what Product Categories you want to
publish the Item in, use Instant Publishing
to select them.
o
To minimize page loads Instant Publishing initially lists just the first two levels of
Categories in your Product Catalog. If
you need to publish the Item below the second level, enter the Categories Level you want to publish to
and click the  icon to retrieve and display the additional
levels.
icon to retrieve and display the additional
levels.
o
Click on a Category to select it.
o
To select additional Categories hold down the
Ctrl key when you click on a Category.
§
Click on the  button
located at the bottom of the page or use the CTRL-ALT-S hotkey to save
what you have entered thus far.
button
located at the bottom of the page or use the CTRL-ALT-S hotkey to save
what you have entered thus far.
§
If you want to enter comparable products, click
on the Comparable Products tab. For detailed instructions see the section of
this chapter titled How to Add Comparable Products:

§
If you want to enter related products such as
accessories, click on the Related
Products tab. For detailed
instructions see the section of this chapter titled How to Add Related
Products:

§
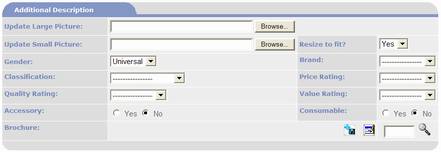
If you have a large picture of the product,
click on the  button to the right of the Update Large Picture textbox.
§
Using the file dialog box select the file of the
picture to upload.
§
Repeat for Small
Picture.
- Leave Resize
to Fit set to Yes, which is
the default value.
- If applicable select values for the other fields in Additional Description section.
- To add a Brochure:
- Click on
the
 Add Brochure icon to upload a new
brochure from you computer;
Add Brochure icon to upload a new
brochure from you computer;
- Or click on
the Edit Brochure icon to create a brochure
using the PORTALPRODIGY Document Editor;
- Or enter a Resource
Document ID in the
 text box to use an existing Brochure
that is loaded in the Resource Document Library;
text box to use an existing Brochure
that is loaded in the Resource Document Library;
- Or click on
the
 Search for Brochure Icon to find and
link an existing Brochure that is in the Resource Document Library.
Search for Brochure Icon to find and
link an existing Brochure that is in the Resource Document Library.
- If you want to display additional pictures of the
Item, click
 to load the pictures.
- If you want to attach documents to the Item such as
specifications, white papers, and warranty information, click
 to load the documents.
- Click the
 option button at the bottom of the page
to save the Item.
option button at the bottom of the page
to save the Item.
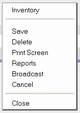
 Right Click Menu: you may right click anywhere on the Items
Management page to display a pop-up menu as shown below that contains
duplicates of the option buttons at the bottom of the page.
Right Click Menu: you may right click anywhere on the Items
Management page to display a pop-up menu as shown below that contains
duplicates of the option buttons at the bottom of the page.
- If you created both Sizes and Colors,
as part of the Save process PORTALPRODIGY displays the Item Inventory List
page shown below:
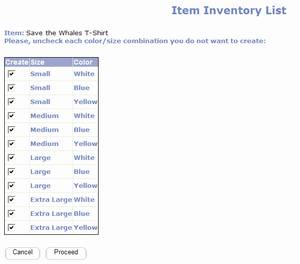
o
By default all combinations of sizes and colors
are checked.
o
Uncheck each combination that you do want
included in your Product Catalog.
o
Click  to save.
§
If you have the option to enter Initial
Inventory turned on in Product & Inventory Features Management you may
enter your initial inventory quantities as follows:
o
Click on the  link displayed at the bottom of the Items
Management page to display the Inventory Management page shown below.
link displayed at the bottom of the Items
Management page to display the Inventory Management page shown below.
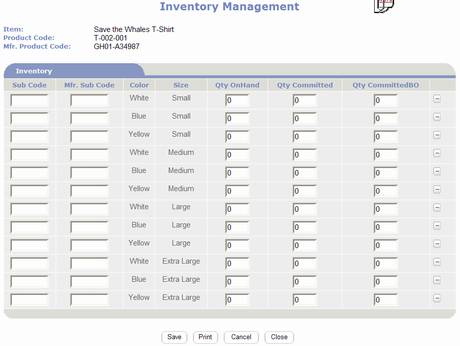
o
If you are using Produce Codes, enter a Sub
Code for each color / size combination.
o
You may also the manufacturers sub code in Mfr Sub Code for each color / size
combination.
o
Enter the current quantity on hand into the Qty. OnHand field for each color / size
combination.
o
Enter the current quantity of your Qty. OnHand
that is committed to orders into the Qty.
Committed field for each color / size combination.
o
Enter the current quantity that is committed to
orders that is not on hand (on backorder) into the Qty. CommittedBO field for each color / size combination.
o
When finished click  and confirm save.
§
PORTALPRODIGY returns to the Item Management
page. If finished entering Item
information, you can click .


