Used to create and edit pages formatted as tables.
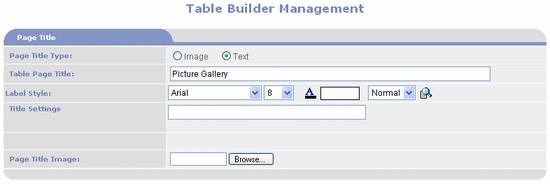
Page
Title Type – select either Image
to Text.Image is used to upload either a JPG or
GIF image file.Text is use to enter the title into
the Table Page Title field.
Table
Page Title – when Page Title Type is set to Text, enter a title here.
Label Style – when Page Title
Type is set to Text, used format
the Page Title:
Font Type list box – select font from list.
Font Size list box – select a size from list.
Font Color selector – select a color by clicking on to display color selection or enter a
hexadecimal code in the text box.
Font Style – select either Normal or
Bold from list.
Preview – click to preview the Page Title.Page Title is displayed on row below.
Title
Settings – not used.
Page
Title Image – click on button to select a JPG or GIF file to use
as the Page Title.
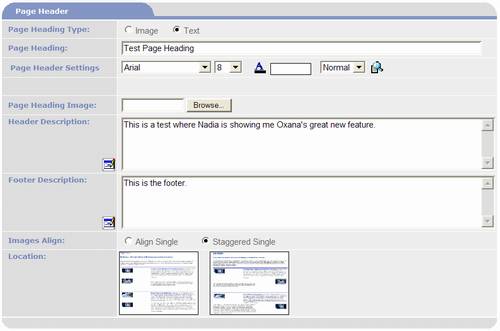
Page
Heading Type – select either Image
to Text.Image is used to upload either a JPG or
GIF image file.Text is use to enter the heading
into the Page Heading field.The
page heading is left aligned and displayed below the Page Title and above
the Page Description.
Page
Heading – when Page Heading Type is set to Text, enter a heading here.
Page
Header Settings – when Page Title Type is set to Text, used format the Page Title:
Font Type list box – select font from list.
Font Size list box – select a size from list.
Font Color selector – select a color by clicking on to display color selection or enter a
hexadecimal code in the text box.
Font Style – select either Normal or
Bold from list.
Preview – click to preview the Page Heading.Page Heading is displayed on row below.
Page
Heading Image – click on button to select a JPG or GIF file to use
as the Page Heading.Can be used to
display a picture.
Header
Description – enter text into the memo field or click on the HTML Editor icon to create content using
the Portal Prodigy HTML Editor.The
HTML Editor can be used to create links, insert pictures, and create
colorful content.The Header
Description is displayed below the Page Heading, before the Table Items.
Footer
Description – enter text into the memo field or click on the HTML Editor icon to create content using
the Portal Prodigy HTML Editor.The
HTML Editor can be used to create links, insert pictures, and create
colorful content.The Footer
Description is displayed at the bottom of the page after Table Items.
Images
Align – select either Align
Single or Staggered Single
format.Location thumbnails
described below show example of each format.
Location
– thumbnail images to show format of table for each Image Align option.
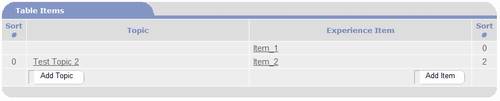
Topic Names as Links - click on
a name to open the Table Topic Management page to edit or remove the
Topic.
Item
Names as Links – click on a name to open the Table Item Management
page to edit or remove the Item.
- click on this button to create new
Topic using Table Topic Management page.
– click on this button to create new Item
using Table Item Management page.
Saves the Table Page settings entered on this page.
Deletes current record.PORTALPRODIGY will prompt to confirm deletion of the record.Select OK to confirm the deletion or CANCEL
to abort the deletion.
Print the current page (contents of your browser window)
according to your browser’s print settings.
Close the page discarding all entries and edits.
Close the page and save changes.PORTALPRODIGY will prompt to save
changes.OK response saves changes,
closes page, and returns to previous page.CANCEL response discards all entries and edits (same as Cancel button).