Used to configure Product Orders.
Details section:
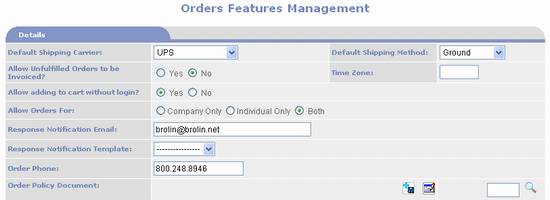
- Default Shipping Carrier – product orders will
default to this shipping carrier.
Selecting “None” forces the user to select a value before an order
can be saved. Example values -
“Fed-X”, “UPS”.
- Default Shipping Method – if a Default Shipping Carrier is selected,
a default shipping method must be specified, e.g. Ground or Next Day
Morning
- Allow
Unfulfilled Orders to be Invoiced - set to Yes to allow unfulfilled Order to be invoiced and to No to not allow unfulfilled Orders
to be invoiced. Defaults to Yes. When unfulfilled Orders are invoiced,
PORTALPRODIGY creates GL Entries in the special Unfulfilled GL
Accounts. When the Orders are later
fulfilled, PORTALPRODIGY creates reversing entries in the Unfulfilled GL
Accounts and creates offsetting entries for the Fulfilled GL
Accounts.
- Time Zone
– specify the time zone used for orders.
- Allow adding
to cart without login? – set to “Yes” to allow customers to add items
to their shopping cart without being required to login. Set to “No” to require customers to
login when they attempt to add the first item to their shopping cart. When customers are required to login
they are presented with the option to login or signup as a new user. You
may specify a Quick Registration form for new user signup. This is specified on the User Signup Management
page which is accessible from the Features Management menu.
- Allow Orders
for – select one of the following options:
- Company Only
– this option will require a Company Name to be specified during the
checkout process.
- Individual
Only – this option will not allow a Company Name to be specified
during the checkout process.
- Both – this
option will present the customer with the selection “Order for Individual
or Company?” When Company is
selected it will require a Company Name to be specified during the
checkout process. When for
Individual it will remove the Company Name field.
- Response Notification Email – specify the
email address of the person responsible for processing new orders and
PORTALPRODIGY will notify this person every time an order is placed.
- Response Notification Template – specify the
email Broadcast Template to use when sending the Response Notification
Email. When no template is
specified, PORTALPRODIGY uses a default template with very basic
information. PORTALPRODIGY allows
the creation of a customized template tailored to your organization’s
needs. Customized Email Broadcast
Templates are created using the Broadcast Feature.
- Order Phone – enter your organization’s sales
or customer service telephone number to be displayed during the shopping
checkout process.
- Order Policy Document - Add Policies Document
– click on this link to load a document containing your organization’s
order policies. Order polices are
the Terms and Conditions for orders placed on your organization’s
Website. (See the section titled Order Policies Document Management
page for detailed explanation.) PORTALPRODIGY stores the Order
Policies as a document in the Document Resource Library, which allows it
to be linked to other pages within your PORTALPRODIGY Website. The following options are used to attach,
edit and remove your Order Policies document:
o
 - used
to upload the document to the PORTALPRODIGY Document Resource Library and automatically
attach it the Order Process.
- used
to upload the document to the PORTALPRODIGY Document Resource Library and automatically
attach it the Order Process.
o
 - used
to create or edit an existing document using the PORTALPRODIGY Document Editor.
- used
to create or edit an existing document using the PORTALPRODIGY Document Editor.
o
 -
used to attach a document that already exists in the Document Resource
Library. Either enter a Document ID into
the text box or click on the
-
used to attach a document that already exists in the Document Resource
Library. Either enter a Document ID into
the text box or click on the  lookup icon to use the Search For Documents
feature to locate and select an existing document.
lookup icon to use the Search For Documents
feature to locate and select an existing document.

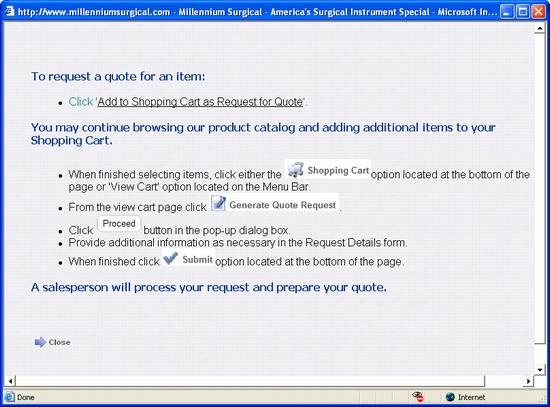
- Request
Quote Instructions – if you have enabled the Request a Quote Pricing
Method, this is where you enter instructions to be displayed to the
customer that explains how your quote request process works. The instructions are displayed in a
pop-up window when the customer clicks on the Request Quote link in your
product catalog or product detail pages.
Instructions may be entered as plain text or in HTML format. You may use the PortalProdigy document editor to format
your instructions. The
following is an example of instructions that were created using the
PortalProdigy document editor. This
is how they are displayed to the customer.
- Place
a Bid Instructions – if you have enabled the Place a Bid Pricing
Method, this is where you enter instructions to be displayed to the
customer that explains how your bidding process works. The instructions are displayed in a
pop-up window when the customer clicks on the Place a Bid link in your
product catalog or product detail pages.
Instructions may be entered as plain text or in HTML format. You may use the PortalProdigy document editor to format
your instructions. They are
displayed the same as the Request a Quote instructions.
- Customer
Order Status Page Title – enter a title to be displayed in the main
content section of the Customer Order Status Page. This is the page where customers can
view a list of their orders including that status of each order and
tracking information once the order has been shipped.
- Customer
Quote Status Page Instructions – if you have enabled the Request a
Quote Pricing Method, this is where you enter instructions to be displayed
to the customer that explains how to place an order for their quoted items. The instructions are displayed on the
page. Instructions may be entered
as plain text or in HTML format.
You may use the PortalProdigy document editor to format
your instructions.

Manage each of the following options by clicking on the links.
- Credit
App Account Types – click on this link to define and edit the
list of valid Credit Types permitted for use.
- Credit
Rating – click on this link to define the list of valid Credit
Rating values permitted for use.
- Shipping
Carriers – click on this link to define and maintain Shipping
Carriers and shipping rates.
- Taxes
– click on this link to define tax districts and tax rates.
Order Contact Us section:
This section is
used to enter the Contact Information to be
displayed to customers when they need to contact you regarding their product
orders.
- Name
– enter the name of the organization to contact. Typically this is your organization’
name.
- Address
1 – enter the street address.
- Address
2 – if a second line is need for the street address enter it here.
- City
– enter the city.
- Country
– select the country from the list box.
- State
/ Province – when USA,
Canada, or
Mexico is
selected as the Country you will be presented with a list box to select
the State or Province. For all
other Countries you will be presented with a text box.
- Zip
/ Postal Code – enter the zip or postal code.
- MapQuest
option
 - click to verify MapQuest’s ability
to map your Order Contact Us address.
- click to verify MapQuest’s ability
to map your Order Contact Us address.
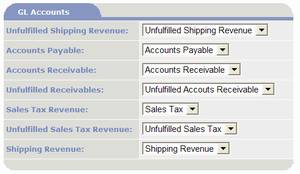
GL Accounts section:
- Unfulfilled
Shipping Revenue – the GL Account specified here will be credited when
unfulfilled orders are invoiced; and it will be debited when previously
invoiced orders are fulfilled (shipped).
- Accounts
Payable – the GL Account specified here will be credited when
purchases are made.
- Accounts
Receivable - the GL Account specified here will be debited when “on
account” orders are fulfilled (shipped); and credited when payments are
applied to fulfilled (shipped orders).
- Unfulfilled
Receivables – the GL Account specified here will be debited when
unfulfilled “on account” orders are invoiced.
- Sales Tax Revenue – posting of
orders will credit this GL account with the total invoice sales tax
amount.
- Unfulfilled
Sales Tax Revenue – the GL Account specified here will be credited
when unfulfilled orders are invoiced.
Debited when previously invoiced orders are fulfilled (shipped).
- Shipping Revenue – posting of
orders will credit this GL account for the total invoice shipping fees
(freight) amount charged.
|

|
Saves the Orders Features Management settings entered on
this page.
|
|

|
Print the current page (contents of your browser window)
according to your browser’s print settings.
|
|

|
Close the page discarding all entries and edits.
|
|

|
Close the page and save changes. PORTALPRODIGY will prompt to save
changes. OK response saves changes,
closes page, and returns to previous page.
CANCEL response discards all entries and edits (same as Cancel button).
|


