Used to build and maintain menus for your PORTALPRODIGY
Website including the menus that are an integral part of your PORTALPRODIGY
Website template. Menu Builder can
produce several different types of menus, each serving different purposes. Menu Builder can be used to build role based
menus that are displayed once a user has been identified as a result of logging
into the PORTALPRODIGY Website. Menu
Builder can also be used to build specific feature based menus and to create
additional sub menus that can be accessed from a Mini Browser, document, or
other menu.
Search Criteria section:
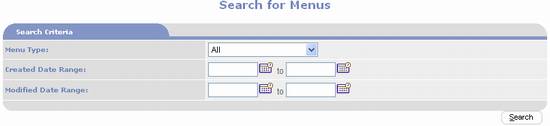
- Menu Type: -used to search for menus by Menu Type.
- Created Date
Range: - used to search for menus by the date
they were created.
- Modified Date
Range: - used to search for menus by the date
they were modified.
- Search Button
 :
- submits the search criteria and displays the matches below.
:
- submits the search criteria and displays the matches below.
Found Menus section:
Displays the search results
listing existing menus.
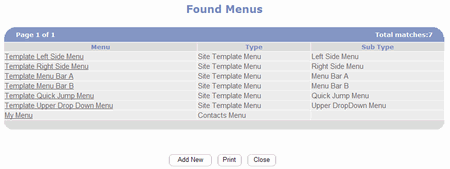
- Menu - this
is the name assigned to the menu.
Click on the menu to link to view and edit the menu.
- Type – categorizes
the menus by purpose.
- Sub Type – sub-categorized
the menus by purpose.
Menu Information
section:
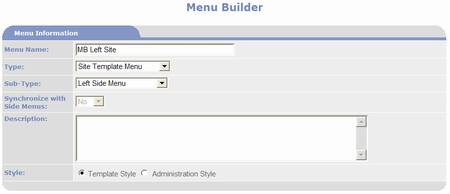
- Menu Name - used to assign a textual name for easy identification.
- Type – the
following selections are available to choose from:
- Side Bar Menu: use to create a menu designed for placement
within a page Side Bar.
- Header Bar Menu: use to create a menu designed for placement
within a page Header.
- Footer Bar Menu: use to create a menu designed for placement
within a page Footer.
- Quick Jump Menu: use to create a menu as a list box of menu
items. Quick Jump Menus are great
for placement in tight places on a page.
Use any time you need to provide a list of hyperlinks.
- Independent Menu: specifies that the menu is independent
of the standard template. This
type of menu is displayed as its own page and can only be accessed by
creating a link to it. It is
extremely useful for creating sub-menus.
- Contacts Menu: specifies that the menu is for use by
the Contact Menu feature. The
Contact Menu feature allows each contact/user to have a menu assigned to
them. This is typically used to
create personalized menus or special menus for specific groups. This type of menu is assigned to a
contact from the contact’s Contact Management page.
- Exchange Listings Menu: specifies that the menu is for use by
Exchange Menu features. The
Exchange Menu feature allows each Exchange to have a customized menu of
options.
- Quick Jump Menu - used to define
the menu for templates that display a drop down list menu. Currently only template 7 supports this
type of menu.
- Description - applicable when Menu Type is set to Independent Menu, Contacts
Menu or Exchange Listings Menu. Used to display a description above the
menu. You may enter a textual
description directly into the memo field or use the
 PORTALPRODIGY Document Editor to create
the description as HTML.
PORTALPRODIGY Document Editor to create
the description as HTML.
- Style – this
option is only applicable when menu Type is set to either, Contact Menu,
Independent Menu, or Exchange Listings Menu. Styles are templates that control how
the menu is displayed in the main content section of the page.

It provides the following options:
- View Styles
– use to open Style Selection to select a standard menu style that is
included with PortalProdigy.
- Edit Styles
– opens Style Manager in edit mode to edit the selected menu style as
well as to clone it. Note that
standard styles cannot be edited.
Standard styles can be cloned and the clone can then be edited.
- Add Style –
opens Style Manager in add new mode to add a new menu style.
Menu Items section:
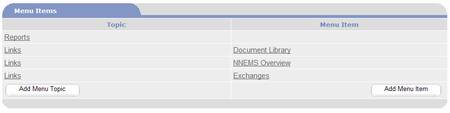
- Topic - lists the defined Topics.
- Menu Item - list the defined Menu Items.
- Add Menu Topic: used to add a new Menu Topic.
Not all menu styles use Topics. Topics are used to group Menu
Items. Topics can be created as
hyperlinks or just headings.
- Add Menu Item
- used to add a new Menu Item.
Menu Items are hyperlinks.
Record section:
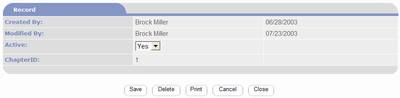
- Created By
- the name of the user that created the record and the date it was
created. Lists user’s first name
followed by last name.
- Modified By
- the name of the user that last modified the record and the date it was
last modified. Lists user’s first
name followed by last name.
- Active: by
default this value is set to “Yes”, which means the record is active and
available for use. To deactivate a
record, set it to “No”.
Deactivating a record is a logical form of deletion. It is used to remove the record from
future use, yet maintain the relationship with existing data. Reports by default only include active
records; however, there is a reporting option that allows inclusion of deactivated
records.
- ChapterID
- This value is only applicable if you are using the PORTALPRODIGY Site
Synchronization feature. It is used
to specify the Chapter that has primary ownership of the record. For further information see the chapter
on Site Synchronization.
Option Buttons:
 used
to save the data and continue working on the page.
used
to save the data and continue working on the page.
 used to delete current record. PORTALPRODIGY will prompt to confirm deletion
of the record. Select OK to confirm the
deletion or CANCEL to abort the deletion.
used to delete current record. PORTALPRODIGY will prompt to confirm deletion
of the record. Select OK to confirm the
deletion or CANCEL to abort the deletion.
 used to print the current page (contents of
your browser window) according to your browser’s print settings.
used to print the current page (contents of
your browser window) according to your browser’s print settings.
 used to close the page discarding all
entries and edits.
used to close the page discarding all
entries and edits.
 used to close the page and save changes. PORTALPRODIGY will prompts to save
changes. OK response saves changes,
closes page, and returns to previous page.
CANCEL response discards all entries and edits (same as Cancel button).
used to close the page and save changes. PORTALPRODIGY will prompts to save
changes. OK response saves changes,
closes page, and returns to previous page.
CANCEL response discards all entries and edits (same as Cancel button).


