The Product and Inventory Features Management page is used
to configure universal options and settings for the Product and Inventory
feature.
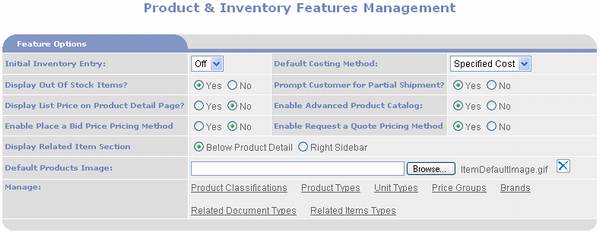
Feature Options
section:
Initial Inventory Entry – used to allow direct
setup of initial inventory quantities.This should be set to “Off” once the initial inventory setup has
been completed.Default setting is
“Off”.Changing the values causes a
warning prompt to be displayed.
On –
allows inventory quantities to be entered directly into Item/Product
Management and does not create GL Journal Transaction entries.
Off –
requires inventory quantities to be entered and adjusted via either:
Inventory Entry, Fulfillment, or Inventory Adjustment pages, which create
GL Journal Transaction entries.
Default
Costing Method – used to set a default value when a new Item record is
created.You can leave it set to
blank or chose one of the following:
Average Cost
– used to value inventory of the Item at the average cost of the Item.
Specified
Cost – used to value inventory of the Item at the cost entered in the
Cost field for the Item record in Item Management.
Display Out of Stock Items – default setting
is “Yes”.
Yes –
causes inventoried Items with Quantity on Hand of zero to not be
displayed in Product Catalog.
No –
causes inventoried Items with Quantity on Hand of zero to be displayed in
Product Catalog.When a customer
orders an Item that is not in stock, PORTALPRODIGY will prompt customer
with notification that item is not in stock and provides option to accept
backorder or to remove from their shopping cart.
Prompt Customer for Partial Shipment – used to
turn option on/off.Default setting
is “No”.
Yes –
causes prompt to be displayed during Shopping Checkout process that asks
Customer if they will accept partial shipment.If the customer selects “No”, PORTALPRODIGY
will require complete fulfillment of all of the Order’s Items before the
order can be shipped.
No –
turns prompt off and allows Orders to be partially shipped, creating a
backorder for the unshipped Items.
Note that for each Item, you can Limit Orders to Qty on Hand
using setting in Items Management.
Display List
Price on Product Detail Page? – if you want customers to see the List
Price in addition to your Sales Price, set this to “Yes”; otherwise leave
it set to “No”.
Enable
Advanced Product Catalog – set this to “No” only if you have a really
simple product line and you do not care to control how your product
catalog is displayed; otherwise set to “Yes”.Setting to “Yes” enables the Product
Catalog option on the Site Administration Menu. The Product Catalog gives
you the ability to define your product categories and how your products
are displayed.
Enable Place a
Bid Pricing Method – set to “Yes” to turn on the Bid Pricing
feature.When Bid Pricing is
enabled “Place a Bid” is included as one of the Pricing Method selections
in Item Management.Bid Pricing
allows customer to submit bids for items in your Product Catalog.Leave set to “No” to disable Bid
Pricing.
Enable Request
a Quote Pricing Method – set to “Yes” to turn on the Request for Quote
(RFQ) feature.When Request a Quote
Pricing is enabled “Request Quote” is included as one of the Pricing
Method selections in Item Management.Request a Quote Pricing allows customer to submit a RFQ for items
in your Product Catalog.Leave set
to “No” to disable Request a Quote Pricing.
Display
Related Item Section – use to specify where Related Items are
displayed on the Product Detail page.Related Items are used to generate add-on-sales, cross selling, and
up-selling.The following choices
are available:
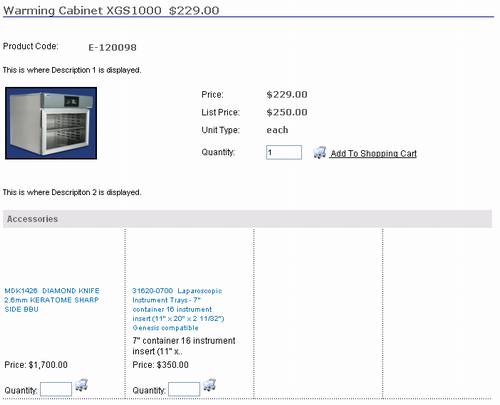
Below
Product Detail – displays the related items in the location shown
below:
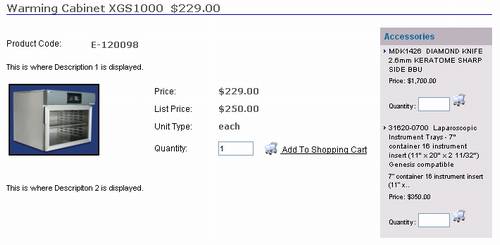
Right
Sidebar – displays the related items in the location shown below:
Default Products Image – you may load an image
here that will be displayed in the Product Catalog and Product Detail
pages when no image has been loaded in Item Management for the Item.Click to load an image file from your
computer.Once an image has been
loaded it can be deleted by clicking Remove Image option.
Manage – click on any of the following links
to display the management page for that data type:
Product Classifications - create list of
available Classifications that can be assigned to Items using Item
Management.Example values: Clothing, Gifts, Books, &
Stationary.
Product Types - create list of available
Types that can be assigned to Items using Item Management.Example values: T-Shirts, Sweat Shits, Hats, & Sports Shirts.
Unit Types - create list of available Unit
Types that can be assigned to Items using Item Management.Example values: Each, Box, Dozen, & Hour.
Price Groups
– create Price Groups that can be assigned to customers.Price Groups are used to assign special
pricing, including volume pricing.Examples values: Reseller Tier 1, Reseller Tier
2,& Preferred Retail Customer.
Brands – create list of available Brands
that can be assigned to Items using Item Management.Example values: Nike, Ralph
Lauren, & DK&Y.Also used to create Comparable
Brands.
Related
Document Types – create a list of Types that can be used to categorize
related documents.Example values:
Brochures, Warranty Information, & White Pagers.
Related Item
Types – create a list of Types that can be used to categorize related
products.Example values: Accessories, Customers that bought this
also bought, & You may also want to consider.
Item Comparison
section:
This section is used to set up a special page for searching
and displaying comparable products. E.g. the customer could use this page to
enter a competitor’s product code (part#) to find your comparable product; or
the customer could use it to locate an alternative product when the one they
are looking for is not available; or the customer could use it to compare
pricing of comparable products from different vendors.This section also configures how the standard
Product Search is used for finding Comparable Products.You should create your Comparable Brands
after configuring this section.
Comparison
Products Section Title – enter the label that you want displayed on
the Product Detail page when listing Comparable Products.
Comparable
Product Search Page Title – enter the page heading that you want
displayed on the Comparable Product Search page. This is a page that
customers can use to enter competitors product codes and manufacturers
product codes to find your equivalent products.
Search Label
– enter the label you want displayed for the search criteria text box on
the Comparable Product Search page.
Comparable
Product Search Page Instructions – enter instructions or any other
information that you want displayed on the Comparable Product Search
page.You may enter them as text
directly into the memo field or you may click to create them using the HTML editor.
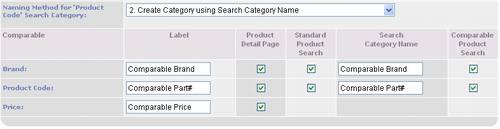
Naming Method
for ‘Product Code’ Search Category – this is used for controlling Product
Search.It allows you to control
how Product Detail Categories for the Product Code of Comparable Products
get listed in your Product Search.Product Search is comprised of a Product Detail Category list box
and a text box.The Product Detail
Category list box allows the customer to limit their search to a selected
category such as “Brands”, “Product Code” and “Product Name”.E.g. for Comparable Products you may
want customer to search for them listed under the category “Product Code”
which is the same category used by your other products; or you may want to
specify a category such as “Comparable Product Code”; or you may want to
create unique categories for each of your competitors brand’s such as “IBM
Product Code”, “Microsoft Product Code”, “Oracle Product Code, etc.The naming choices are:
Use Existing
Product Code Category – choose this setting to use the category
“Product Code” for searching for Comparable Product Codes.
Create
Category using Search Category Name – choose this setting to use the category
entered in the Product Code Search Category Name field as shown below.
Create
Category by Appending Brand Name to Search Category Name – choose
this setting to have the system automatically create a category for each
new Comparable Brand that you create.E.g. for the comparable brands “Apple”, “IBM”, Microsoft”, and
“Oracle” it will create the following categories: “Apple Part #”, “IBM
Part #”, “Microsoft Part #”, “Oracle Part#”, etc.
If you plan to use this setting select it prior to creating
your Comparable Brands.When you save a
new Comparable Brand the system automatically creates a Product Detail Category
for the Comparable Product Code based on the settings in this section.When you change the settings, previously
created Product Detail Categories will need to be manually changed.This can be done by clicking on the Detail
Categories option located in the Product Detail Options section of this page.
Comparable
options for Brand, Product Code and Price:
Label –
enter the label that you want the customer to see.
Product
Detail Page – check if you want to display on the Product Detail
page.
Standard
Product Search – check if you want to include in the standard Product
Search.If checked the customer
will have the option of searching on this value using the standard
product search.
Search
Category Name – enter the name that you want listed in standard
Product Search available to customers.
Comparable
Product Search – check if you want to include in search option displayed
on the special Comparable Products page.
Product Detail
Options section:
Product Detail Categories are equivalent to custom
fields.You can define as many of these
custom fields (referred to in PortalProdigy as a Product Detail Categories) as
you need. Product Details Categories can be individually defined as searchable
by customers.When a Product Detail
Category is defined as searchable, it is listed in the Product Search list box
that customers use to search your product catalog.PortalProdigy also allows you to specify
whether the pre-defined fields Product Type, Brand, and Classification should
be added as Product Detail Categories so your customers can search on
them.
The following fields which entered in Item
Management are automatically added to Product Search: Product Name, Short
Description, Description 1, and Description 2.Thus PortalProdigy will automatically index these fields (including HTML
Descriptions) and the field names will be listed in the Product Search list
box.
Add to Product
Detail Categories:
Product Type
– set to “Yes” to allow customers to search on the Product Type field.
Brand –
set to “Yes” to allow customers to search on the Brand field.
Classification
– set to “Yes” to allow customers to search on the Classification field.
Manage:
Detail Categories - create list of available
Detail Categories that can be assigned to Items using Item
Management.Detail Categories are
used by the Product Keyword Search feature.Example values: Author, Subject, ISBN, & Publisher.
Product Downloads
section:
Use to configure downloading of
digital products such as music, video, images, documents, etc.
Enable –
set to “Yes” to turn on the Product Catalog feature.
Broadcast
Template – used to select a Broadcast Template that will format the
automated email sent to the customer. The automated email is used to send
the customer a download code and link to the download page of your
website.It gets sent upon payment
approval.Broadcast Templates are
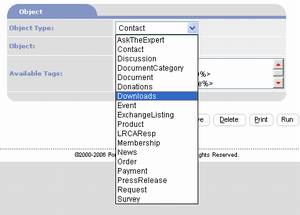
created using Broadcaster.The
Broadcast Template list box only lists Templates that have Object Type set
to “Downloads”.Object Type is a
selection in the Broadcaster as shown below.The “Downloads” Object Type includes
object tags to insert various fields including the
<%DOWNLOADS:DownloadID%> tag used to insert the customers download
key and the <%DOWNLOADS:DownloadLink%> tag used to insert a link to
the website to download their product.
Days Active
– enter the number of days, as an integer, that the customer’s download
key shall remain active.E.g. set
to “30” to allow them to use their download key for 30 days from the date
of their order before it expires.
Download Limit
– enter a number of times, as an integer, that the customer may use their
download key.E.g. set to “3” to
allow them to download their product 3 times.
Download
Instructions – enter instructions to be displayed on the download
page.
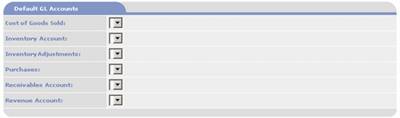
GL Accounts section:
Used to specify the default GL
accounts when adding new products in Item Management.For each Item you may specify the GL Accounts
to be posted when the Item is sold, received or adjusted.The Enable GL Entries option must be turned
on in GL Features Management in order for PORTALPRODIGY to record GL
Transaction Entries.
Cost of Goods
Sold – used to select a default account value for Items.This is the GL expense account that is
debited when an Item is sold.
Inventory
– used to select a default account value for Items.This is the GL asset account that is
debited when an Item is received in inventory and credited when an Item is
shipped or adjusted for loss.
Inventory
Adjustments – used to select a default account value for Items.This is the GL expense account that is
debited when an Item is adjusted for loss.
Purchases
– used to select a default account value for Items.This is the GL liability account that is
credited when an Item is purchased.
Revenue –
used to select a default account value for Items.This is the GL revenue account that is
credited when an Item is fulfilled.
Unfulfilled
Revenue – used to select a default account value for Items.This is the GL revenue account that is
credited when an Item is ordered but not fulfilled. When an Item is fulfilled
and invoiced this account is debited and the specified Revenue is
credited.
Sales Returns
& Allowances – used to select a default account value for
Items.This is the GL revenue
account that is debited when an Item is returned or an allowance is made
to the customer.