This is where you define your Product Catalog for customer
shopping. Products Catalog Management is
used to create a hierarchal catalog structure composed of an unlimited number
of categories and sub categories that are used to list your products. The catalog can also contain an unlimited
number of sub category levels. You
define how each category and sub category should appear and what product items
each should contain.
Items are easily added to categories from the Category
Management page using a batch selection process. Items may also be individually assigned to
categories from Item Management. Each
Item may be listed in multiple categories.
E.g. the book “John Adams” could be listed both under “American History
> Biographies” and under “Authors > McCullough”. When a customer clicks
on an item listed in a Product Catalog Category listing it is opened in a
Product Details page. Note that the
options selected here do not affect how the item is displayed in the Product
Detail page. The Product Detail page is
individually managed for each item using the options available in Item Management.
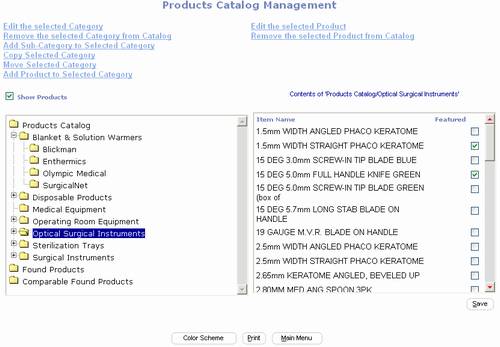
- Edit
the selected Category:
click on this option to edit the configuration of the category selected
(highlighted) in the category list.
You may alternatively double click on the Category name.
- Remove
the selected Category from Catalog: click on this option to delete the
category selected (highlighted) in the category list.
- Add
Sub-Category to Selected Category: click on this option to create a new
category. The new category is added
as a sub-category to the category selected (highlighted) in the category
list below it. PORTALPRODIGY
supports an unlimited number of categories, sub-categories and levels.
Page Settings section:

- Use - select one of the following:
o Page
Type Default Settings – use to
select the default Page Settings Collection for this feature. The Default Settings for each feature are set
from Page Type Manager which is listed on the Utilities Menu. When PortalProdigy is first installed, each
feature is set to inherit the Site Settings Collection.
o Other – use to select a specific Page Settings
Collection from the list box.
- Add
New button
 use to create a new Page Settings
Collection.
use to create a new Page Settings
Collection.
- Page
Manager button
 use to open Page Manager to view and edit
the selected Page Settings Collection.
use to open Page Manager to view and edit
the selected Page Settings Collection.
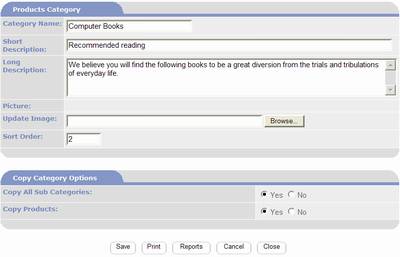
Products Category section:
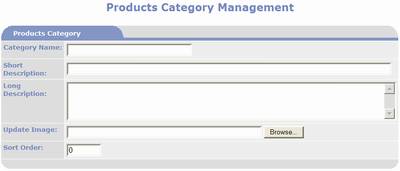
- Category Name: enter a
name for the Category.
- Short Description:
enter a short description to appear below the category name in
category listings.
- Long Description:
enter a long description to appear in the header for the category.
- Update Image: used to
upload a picture to appear in the header for the category.
- Sort Order: used to
control the order of categories and sub-categories within the catalog. When set to 0, the categories are sorted alphabetically.
Category Appearance
in Clients Part section:
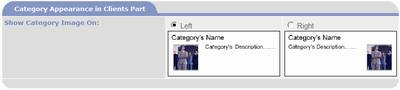
- Show Category Image On:
select either left or right side.
Product Listings section:
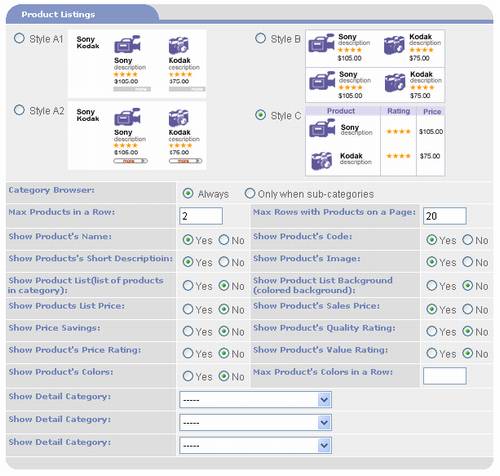
- Style: select one of
the four predefined Styles for listing products.
- Category Browser: used to display a listing of the other
sub-categories on same level as well as their sub-categories. The following choices are available:
- Always: select this option to always display a Category
Browser.
- Only when sub-categories: select this option to only display
a Category Browser when the currently selected category has
sub-categories.
- None: select this option to disable the Category Browser.
- Max Products in a Row: if the selected Product Listing Style
supports multiple products per row, enter the maximum number per
row. E.g. enter 2 to display 2 products per
row. The number of products
displayed per page is determined by the Max
Products in a Row and Max Rows with
Products on a Page settings (multiply the two values to determine
the number of products per page).
PORTALPRODIGY automatically inserts a product count, page count,
links to each page and next and last page navigation options.
- Max Rows with Products on a Page: enter the maximum number of
rows to display per page. E.g. enter
20 to display 20 rows of products per page.
- Show Product’s Name: set
to Yes to display the name of
the product in the Product Info section.
- Show Product’s Code:
set to Yes to display
the Product Code in the Product Info
section. Product Code is your
Part# or SKU for the Item.
- Show Product’s Short Description: set to Yes to display the Short Description.
- Show Product’s Image:
set to Yes to display a
thumbnail of each products image in the Product Info
section. Product and Inventory
Features Management allows a default image to be uploaded. The default image is displayed whenever
a Product does not have an image.
- Show Products List:
set to Yes to display an
alphabetized list of product names on the left side of the content
section. See callout in the
picture above. This list is in addition
to the products and their information listed within the page. This list includes all product names
belonging to the currently selected category and servers as quick access
method to products not shown on the page.
Set to No, to not display
the list.
- Show Products List Background: set to Yes to enable the background color selected in Color Scheme
page for the Products List on the left hand side of page. Used to make the Products List standout
by having a colored background.
- Show Products List Price: set to Yes to display the List
Price. This is meant to show a
comparison between your discounted Sales Price and the List Price.
- Show Products Sales Price: set to Yes to display the Sales Price.
- Show Price Savings: set to Yes to display the Price Savings amount. This is calculated by the system as
List Price less Sales Price.
- Show Product’s Quality Rating: set to Yes to display the Product’s Quality Rating. This is a numerical value entered in
Item Management.
- Show Product’s Price Rating: set to Yes to display the Product’s Price Rating. This is a numerical value entered in
Item Management.
- Show Product’s Value Rating: set to Yes to display the Product’s Value Rating. This is a numerical value entered in
Item Management.
- Show Product’s Colors:
set to Yes to display
color swatches in the Product Info section
for each available color.
- Max Product’s Colors in a Row:
if Show Product’s Colors is set to Yes, enter the number of colors to display per row in the
Product Info Section.
- Show Detail Categories: use to select a Product Detail
Category to display. Up to three
Product Detail Categories may be selected for display in the Product
Catalog Listing.
Sub Categories List
Align:

- Used to select one of the
following options for how Categories are listed:
- Single Column:
displays a single column of Category Names.
- Single Column with Description: displays a single column of Category
Names with the Categories Short Description displayed below the Category
Name.
- 2 Columns Align:
displays the Category Names in two columns.
- 3 Columns Align:
displays the Category Names in three columns.
- Copy
Selected Category: click
on this option to create a new category by copying the selected
(highlighted) category in the category list. This option displays the
Products Category:
- Category Name: used to
change the name of the copied category.
- Short Description:
used to change the short description of the copied category.
- Long Description: used
to change the long description of the copied category.
- Picture: displays the
original file name of the image, if one has been uploaded for the
category.
- Update Image: used to
upload an image. Click on
 to select a new image file.
- Sort Order: used to
control the order of categories and sub-categories within the catalog. When set to 0, the categories are sorted alphabetically.
Copy Category
Options:
- Copy All Sub Categories:
set to Yes to copy all
sub-categories of the copied category.
Set to No to just copy
the selected category.
- Copy Products: set to Yes to copy all products assigned
to the copied category. If Copy
All Sub Categories is set to Yes,
it will copy products for them also.
Set to No to leave
Category empty when copied.
- Move
Selected Category: click
on this option to move the selected (highlighted) category to another
location.
 : The Paste icon option is displayed
after selecting the category to move.
You must highlight the category to move to and click this option.
: The Paste icon option is displayed
after selecting the category to move.
You must highlight the category to move to and click this option.
- Add
Product to Selected Category:
click on this option to add Items to the category selected (highlighted)
in the category list. This displays
the Product Search page as follows:
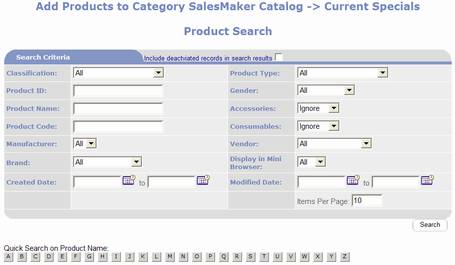
o For
an explanation of the Product Search see the Search For Product Items page section
of this chapter.
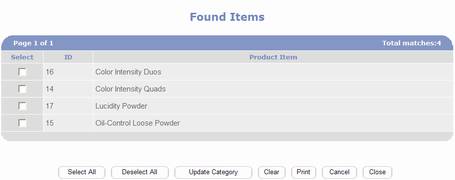
o Select:
checkbox used to check each item to be added to the Category.
o  selects all Found Items.
o  deselects all Found Items.
o  adds the selected Items to the Category.
o  clears the search criteria.
o  prints the website page to the customer’s
local printer.
prints the website page to the customer’s
local printer.
o  closes the page without saving or updating
values.
closes the page without saving or updating
values.
o  on this page Close does same thing as Cancel.
§
Edit the Selected
Product: click on this option
to retrieve the selected Item (highlighted in the category Contents column) in
Item Management.
§
Remove the Selected
Product from Catalog: click
on this option to remove the selected Item (highlighted in the category
Contents column) from the Category.


