The first step is to go to Features
Management and check the Request and Help Desk option then save the page.
Next click on the Request and Help
Desk link and configure Request Feature Management Options as follows:
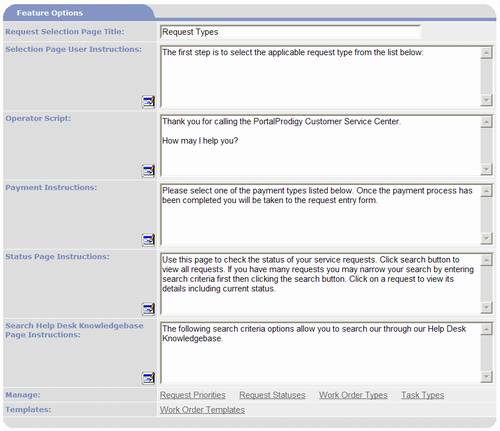
If you plan to use a Request
Selection page, enter a Title to be displayed on the page.E.g. “Our Services”.
If you plan to use a
Request Selection page, enter Selection Page User Instructions.These instructions are displayed
immediately below the Request Selection Page Title.They can be entered directly into the
memo field or you may use the HTML Editor by clicking on the icon.
If you plan to use Operator
Scripts, you may enter a default script here.It will be copied to each new Request
Type that you create.The script
can be entered directly into the memo field or you may use the HTML
Editor by clicking on the icon.You may modify it later for each Request Type.
If you plan to bill for
your services, you may enter Payment Instructions.The instructions will be displayed to
the customer as part of the Work Order approval process.They can be entered directly into the
memo field or you may use the HTML Editor by clicking on the icon.
If you plan to provide
customers/requestors with access to the Request Status Page, you may
enter Status Page Instructions.They can be entered directly into the memo field or you may use
the HTML Editor by clicking on the icon.
If you plan to provide customers/requestors with access to the Help
Desk Knowledgebase, you may enter Search Help Desk Knowledgebase Page
Instructions.This is typically
used to provide instructions for using the search capability including
how to limit or expand the scope of their search.The instructions can be entered
directly into the memo field or you may use the HTML Editor by clicking
on the icon.
If you would like to define
a common set of Request Priority values that will be used by all Request
Types, click on Request
Priorities link and use Request Priority Management to add
values.E.g “High”, “Medium”, and
“Low”.
If you would like to define
a common set of Request Status values that will be used by all Request
Types, click on Request
Statuses link and use Request Status Management to add
values.E.g. “Pending”,
“Assigned”, and “Completed”.
If you plan to bill for
your services or you want to track time working on Requests, click on Work Order Types
link and use Work Order Types Management to create Work Order Types.You will need to create at least one
Work Order Type for each Duration type.Duration refers to the duration of the Work Order; “Incident”
means the Work Order is used for only one Request; “Project” means the
Work Order is used for numerous Requests that are related to a single
project; and “Service Contract” means the Work Order is used to create a
service contract that can apply to multiple Requests.
Click on Task Types then
click Add to create Task Types such as “Input Request”, “Investigate
Request”, “Design”, “Programming”, “Testing & Debugging”, etc.Billable Task Types are assigned to an
Item.New Items can be added
directly from Task Type Management similar to how Event Items and
Membership Items work.Items
created by Task Type Management are automatically created as Service type
Items.
You can skip Work Order
Templates for now.For more
information about Work Order Templates see the chapter titled Work Order
& Time Billing Features in Detail.
The next step is to create templates
for email notifications, as follows:
For each Administrator and
User notification type, you will need to create an email broadcast
Template.Notification templates
are defined using Broadcaster.See
the chapter titled Broadcasting Features in Detail for additional
information.It is important to
set the Object Type to “Request” for each of the notification templates.
If you have not already done so, the
next step is to create Security Groups and Contact records for your staff
that either need to be notified of Request events or assigned tasks
related to Requests.See the
chapter titled Contacts, Members, Vendors, & Companies Features in
Detail and the chapter titled User Groups and Security in Detail for
additional information.