Click the Request Types icon.Note that you may also select the Add New option on the Search for
Request Types page.
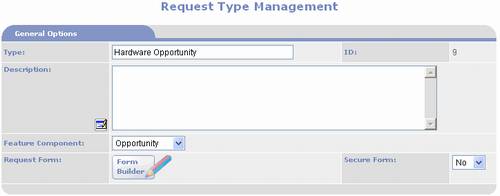
Enter a name for the Request
Type.E.g. “Request for Product
Information”.This name will be
displayed on the Request entry page.
You may enter a Description; however
it is not required.It can be
entered directly into the memo field or you may use the HTML Editor by
clicking on the icon.
If the Request Type will be used in
conjunction with a specific Feature, select the Feature Component from the
list box, otherwise leave it blank.
You are now ready to start building
your form.Click on the Request Form Builder icon to open the Request Form Builder
(Request Form Management page).
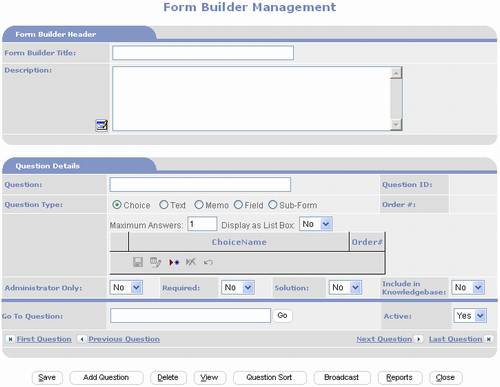
Enter a name for your form into Form
Builder Title field.Note that his
name is not displayed on the form.
You may enter instructions in the
Description field to be displayed on the Request entry form; however they
are not required.They can be
entered directly into the memo field or you may use the HTML Editor by
clicking on the icon.
For each input field (question on your
form) you will need to complete the Question Details section as follows:
Enter a label name in the Question
field.This is the label that you
want displayed on the form.
Select a Question Type.
For Question Type “Choice”
add each choice as a row in the grid.Click on the Add New Record icon to add a
Choice.Click Save Current Record icon when finished
entering the Choice. Use the Order # field to control the order that the
choices are listed.If you want to
display the Choices as checkboxes set Maximum Answers to a number greater
than 1; otherwise they will be displayed as radio button choices.You may alternatively display them in a
list box by setting Display as List Box to “Yes”.
For Question Type = “Text”
select a Data Format for the response.
For Question Type = “Memo”
there are no additional options.
For Question Type = “Field”
select a field from the list box.
For Question Type =
“Sub-Form” click on the link Create Subform to open Sub-Form Builder.For each column that you want in your
sub-form repeat the same steps as adding Questions in your main
form.Sub-Form Builder contains
one additional field Width.Use
this field to control the width of the column. This will not affect the
length of the entries into the fields,but it will limit how much visible at a time. When finished
defining your Sub-Form close and save Sub-Form Builder.Set Default # of Rows to the number of
data entry rows you want visible when the user is in Request Entry.The user will be presented with a
button to add additional rows.
Set Administrator Only list
box to “Yes” if you do not want the Question to be visible in the Visitor
user interface; otherwise leave is set to “No”.
Set Required list box to
“Yes” if you want to require an answer to the question; otherwise leave
it set to “No”.
Set Solution list box to
“Yes” if you want the field to be hidden during initial Request
entry.Solution fields are only
visible for editing from the Administrative user interface.I.e. they are for entering responses to
questions after they have been submitted.Visitors will see the Solution fields on the Request Status page.E.g. your help desk could have a
Question with label = “What would you like to do?”.The user submits their question “How do
I set up my website for PayPal?”.One of your support staffusing Request Management enters “Complete instructions for setting
up PayPal can be found on page 278 of the User Guide and Administration
Manual.” into the solution Question field with label “Answer”.The user will not see the Question
field “Answer” during initial submittal of their question, but when they
visit the Request Status page and view the details of their Request it
will be shown.
Set Include in
Knowledgebase to “Yes” if you want the field to be searchable using the
Requests Knowledgebase feature; otherwise leave it set to “No”.
Click Save.
If you want to add another
question click Add Question; otherwise click Close.
Configure the Entry Options as
follows:
Set Require Login to “Yes”
if you want the user to either login or signup as a new user; otherwise
leave as “No”.Setting to “Yes”
forces each Request to be linked to a Contact record.
If you set Require Login to
“Yes” you should select a Signup Form.Signup forms are created using Quick Registration Builder.For more information see the Chapter
titled Features Management Menu in Detail sub-chapter Feature
Administration – Quick Registration Builder.
Another method of linking
each Request to a Contact record is to set Require Login to “No” and set
Auto Create Contact Record to “Yes”.This configuration requires that you include the Contact Name and
Contact Email fields in your Request form.The user will enter their name and
email address directly into the Request form.When saved, the system will perform
search for email address in Contacts.If an exact match is found it will link the Request to the Contact
record; otherwise it will create a new contact record using the
information from the Request form.
If you want to permit users
to attach documents and files to Requests set Allow Document Attachments
to “Yes”; otherwise leave it set to “No”.
If you want to have the
Request to have a Default Priority value, define values and select one;
otherwise leave blank.To define
Priority values click on the Edit icon to open Request Priority
Management and add new items.
If you want to have the
Request to have a Default Status value, define values and select one;
otherwise leave blank.To define
Status values click on the Edit icon to open Request Status
Management and add new items.
If you want to display
instructions in the first step of the Administrator Request Entry, enter
them in Operator Script.They can
be entered directly into the memo field or you may use the HTML Editor by
clicking on the icon.These instructions are displayed when a Request Type is
selected.
Skip the Project Schema Options.These are for future feature that is
currently not available.
Configure Assignment Options as
follows:
Select an Assignment
Method.This is the method that
will be used for assigning each new Request to an individual or to a
group of people.
If you want to assign the
Request to a specific person, either enter their Contact ID into Assign
to Individual field or click on the Lookup icon to search and select
an existing Contact or add a new one.
If you want to assign the
Request to a group of people, select a group from the Assign to Group
list box.This list box lists all
Security Groups.Security Groups
are created using Group Management.For additional information see the chapter titled User Groups and
Security in Detail.
If you want an email sent
to each person that the Request is assigned to, select an Assignment
Notification Template from the list box.Assignment Notification Templates are created using Broadcast
Manager.For additional
information see the chapter titled Broadcasting Features in Detail.
If you are auto assigning
Requests you need to select an Assigned Task Type from the list box.Assigned Task Types are created using
Task Types Management which can be accessed from Request Features
Management or Tasks Feature Management.
If you want a Task Start
Date to be automatically created, set Task Scheduled Start Date to
“Assignment Date”; otherwise leave set to “Manual”.
If you want a Task End Date
to be automatically created, set Task Scheduled End Date to either
“Assignment Date” or “Requested Response or Completion Date”; otherwise
leave set to “Manual”.
Configure Task Options as follows:
When a Requestor submits a
note the system creates a task to alert someone that the note has been
submitted.If you want to assign a
specific Task Type to this auto created Task, select a Task Type from the
Requetor Notes Task Type list box. Task Types are created using Task
Types Management which can be accessed from Request Features Management
or Tasks Feature Management.E.g.
you may want to create the Task Type “Respond to Requestor Note”.
When a Request is entered
by an administrative user, the system provides the ability to track the
user’s time.It does this by
creating a Task and logging the time spent on the Task.To enable this, select a Admin Entry
Task Type from the list box.Task
Types are created using Task Types Management which can be accessed from
Request Features Management or Tasks Feature Management.
When you want to auto
create more than one Task for a Request, select a Task Template from the
list box.See the How to Create a
Task Template sub-chapter of the Requests and Help Desk Features in
Detail chapter for more information.
If you select a Task
Template you may include “Milestones” and “Deliverables” by checking each
of these options.A check mark
causes the system to copy them from the Task Template to the Request.
Configure Administrator Notification
Options as follows:
For each event select an
email broadcast Template, Send to Group, and/or Send to Individual.
Configure User Notification Options as
follows:
For each event select an
email broadcast Template.
If you intend to bill for your
services or you want to track time working on Requests, configure Work
Order Options as follows; otherwise skip the Work Order Options section:
Select a Work Order Type
from the list box.Work Order
Types are defined using Work Order Type Management which can be accessed
from Request and Help Desk Features Management.The default value is “No Work
Order”.Leave it set to “No Work
Order” if you will not be using Work Orders.
Select a Default Fee Item
ID by clicking the Item Lookup icon.
Using Search for Product Items either search and select an Item or
click the button to create a new Item.
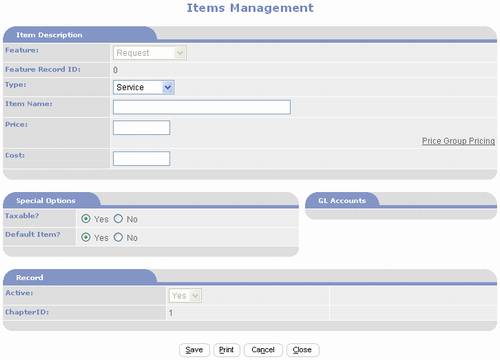
Item Management for Request
Work Order Items appears as follows:
Enter the name of the
service charge in Item Name field.
Enter the fee in Price
field.
If you want to track a
fixed cost for the Item, enter it in the Cost field.
If you want to set up
different pricing for different groups of customers, you will use the
Price Group Pricing option.See
the chapter titled Items/Product Catalog Feature in Detail.
Specify whether the fee is
taxable or not.
Click button and confirm save.
You will be returned to
Request Types Management.The Item
name will be displayed similar to the following:
If you want the customer to authorize a Work Order at the time of
submitting their Request, set Require Approval at Time of Submission to
“Yes”; otherwise leave it set to “No”.It is typically set to yes when you have a fixed fee or minimum
fee.It is typically set to “No”
when you need to estimate the cost based on the submitted information.
If you set Require Approval at Time of Submission to “Yes”, enter a
title in Work Order Approval Title field.E.g.
You may also enter
Work Order Approval Instructions. The instructions can be entered directly into
the memo field or you may use the HTML Editor by clicking on the icon.
If you charging the
customer, enter payment Instructions.The instructions can be entered directly into the memo field or
you may use the HTML Editor by clicking on the icon.
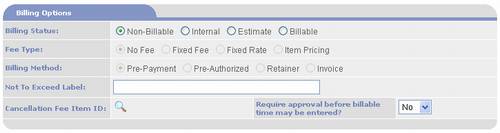
If you intend to bill for your
services you will also need to configure Billing Options as follows;
otherwise skip the Billing Options section:
Select a Billing
Status.Select “Internal” if you
just want to track time and costs but will not bill the customer.Select “Estimate” if you are billing
the customer but don’t know what the fees will be up-front.Select “Billable” if you know what the
fees will be up-front or if you intend to charge a minimum fee.
Select a Fee Type if
Billing Status is set to either “Estimate” or “Billable”.
Select a Billing Method to
determine how you will bill the customer.
If you plan to have the
customer authorize work prior to knowing the charges, you may enter a Not
to Exceed Label.This label will
be used on the Work Order Approval page where the customer enter the
maximum dollar amount they are authorizing.
If you want to charge a
cancellation fee when the customer cancels an already approved work
order, click on the Cancellation Fee Item ID Lookup icon and either select an
existing cancellation Item or add a new one.This works the same as the Default
Item.
If you plan to track billable time for a Request, set Require
Approval Before Billable Time May Be Entered to “Yes”; otherwise, leave
set to “No”.
Configure Confirmation Options as
follows:
You may enter Request Confirmation Instructions which are
displayed to the customer after they have submitted their Request. You
probably want to provide the user with instructions for checking the
status of their Request and how to contact your organization.The instructions can be entered
directly into the memo field or you may use the HTML Editor by clicking
on the icon.
If you want to control the page the user is sent to after clicking
Ok on the Confirmation page, enter the URL in the After Confirmation Go
To field.E.g.