When creating standalone (independent) menus you have the
option of organizing the Menu Items by Topic or without Topics. Menu Builder’s versatility allows Topics to
be added or deleted at any time. When a
Topic is deleted, existing Menu Items assigned to the deleted Topic become unassigned
and will display on the Menu first, before Menu Items assigned to Topics. You can use Menu Item Management to assign
them to a Topic.
- From the Site Administration Menu select Features.
- From the Features Management page select Menu
Builder.
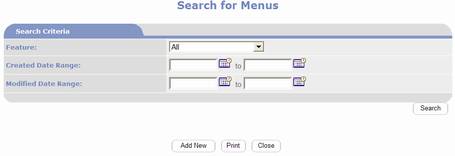
- On the Search for Menus page click
 .
.
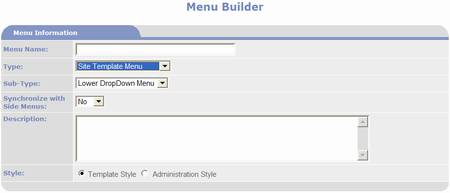
Enter a Menu Name.
Note that this name gets displayed on the menu page as the menu’s
heading.
Select Independent
Menu from the Type drop down list box.
Leave Synchronize with Side Menus set to No as this is not applicable to
Independent Menus.
Enter instructions or anything or other message that you
would like to have displayed above the menu on the menu page. You may either enter a textual description
directly into the Description memo field or you may use the PORTALPRODIGY
Document Editor to create the description as HTML. (For instructions how to uses the Document
Editor see the Document Editor section of the Document Resource Library in
Detail Chapter.)
Select either Template Style or Administration Style.
Click  . The menu is saved to the PORTALPRODIGY
server database and the page Menu Builder page is refreshed to display the Menu
Items section as shown below:
. The menu is saved to the PORTALPRODIGY
server database and the page Menu Builder page is refreshed to display the Menu
Items section as shown below:

To edit a Topic click on the Topic’s Name.
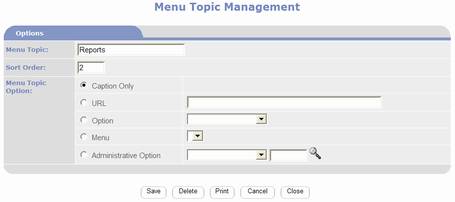
Modify the Menu Topic name and sort order as necessary. It is best to keep Menu Topic names short
because Side Menus will either wrap to a second row or will extend beyond the
border of the menu, depending on the chosen template. Both of these scenarios are unsightly.
To sort all Menu Topics alphabetically, set Sort Order to 0.
Select a Menu Topic Option as follows:
- To display as a label without linking it to anything,
click on the Caption Only radio button.
- To enable as a link to a specified Web page, click on
the URL radio button. When
possible, try to avoid the use of
URLS, as they are subject to change. You may enter the URL with our
without the HTML://.
- To enable as
a link to a PORTALPRODIGY feature, click on the Option radio button, then
select an option from the drop down list.
- To enable as
a link to a menu created using the PORTALPRODIGY Menu Builder, click on
the Menu radio button, then select a menu from the drop down list.
- To enable as
a link to a PORTALPRODIGY Administrative option, click on the Includes Resource Documents, then
select an option from the drop down list.
The lookup feature
 is used to locate the item corresponding
to the selected Administrative Option.
E.g. when Documents is
selected, click on to locate a document using the Search For
Documents page. To make a selection
click on the document name in the Found Documents list. This returns the Document ID to the Menu
Item Management page. If you
already know the Document ID you may enter it directly into the text box.
is used to locate the item corresponding
to the selected Administrative Option.
E.g. when Documents is
selected, click on to locate a document using the Search For
Documents page. To make a selection
click on the document name in the Found Documents list. This returns the Document ID to the Menu
Item Management page. If you
already know the Document ID you may enter it directly into the text box.
Click  and when PORTALPRODIGY prompts you to save
your changes, click OK. An Ok response saves the changes, closes the page, and
returns to the Menu Builder page.
and when PORTALPRODIGY prompts you to save
your changes, click OK. An Ok response saves the changes, closes the page, and
returns to the Menu Builder page.
To edit a Menu Item click on the Menu Items Name.

To place the Menu Item under a different Topic, change the
Topic by selecting a different one from the drop down list.
Modify the Menu Item name and sort order as necessary. It is best to keep Menu Item names short
because Side Menus will either wrap to a second row or will extend beyond the
border of the menu, depending on the chosen template. Both of these scenarios are unsightly.
To sort the Menu Items alphabetically within their assigned
Topic, set Sort Order to 0.
Select a Menu Topic Option as follows:
- To enable as a link to a specified Web page, click on
the URL radio button. When
possible, try to avoid the use of
URLS, as they are subject to change. You may enter the URL with our
without the HTML://.
- To enable as
a link to a PORTALPRODIGY feature, click on the Option radio button, then
select an option from the drop down list.
- To enable as
a link to a menu created using the PORTALPRODIGY Menu Builder, click on
the Menu radio button, then select a menu from the drop down list.
- To enable as
a link to a PORTALPRODIGY Administrative option, click on the Includes Resource Documents, then
select an option from the drop down list.
The lookup feature is used to locate the item corresponding
to the selected Administrative Option.
E.g. when Documents is
selected, click on to locate a document using the Search For
Documents page. To make a selection
click on the document name in the Found Documents list. This returns the Document ID to the Menu
Item Management page. If you
already know the Document ID you may enter it directly into the text box.
Click and when PORTALPRODIGY prompts you to save
your changes, click OK. An Ok response saves the changes, closes the page, and
returns to the Menu Builder page.


