Click the Membership Types icon.Note that you may also select the Add New option on the Search For
Membership Types page.
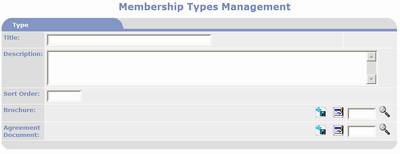
Enter a name and description to be
displayed in the visitor portion of the Website.
You may attach a Brochure and an
Agreement Document.Click on theAdd Brochure icon to upload a new
brochure from you computer or click on theEdit Brochure icon to create a brochure
using the PORTALPRODIGY Document Editor.Use the same options for adding or creating an Agreement Document.
Acceptance Type options:
If you elect to not have an Agreement Document or do not require
the membership applicant to acknowledge acceptance of the Agreement
Document, leave the Acceptance Type set to Not Required.
If you require the membership applicant to acknowledge acceptance
of the Agreement Document and wish to do this electronically, set
Acceptance Type to Online.
If you require the membership applicant to acknowledge acceptance
of the Agreement Document with a handwritten signature, set Acceptance
Type to Signature.Be sure to enter instructions in the
Acceptance Notes field explaining this along with the mailing address
where the membership applicant shall mail their signed copy of the
Acceptance Document.The
Acceptance Notes are displayed during the Membership Signup process in
the Visitor portion of the Website.
To define a Membership Application or
Questionnaire, follow the instructions on
Set the Membership Approval
parameters.
Set the Signup Options as follows:
If the Membership Type is
only for individuals, then select the Individual
radio button and select an Individual Signup Form.
If the Membership Type is
only for companies, then select the Company
radio button and select a Company Signup Form.
If the Membership Type is
for both Companies and Individuals, select the Both radio button and select both an Individual Signup Form
and a Company Signup Form.
Member Applicants must
either log in (if they are already registered as user on your Website) or they
must signup as a new user.Signup Forms
are Quick Registration forms that are used for collecting the signup contact
information (For more info see Quick Registration Builder section in the
Features Management Chapter.)If you
do not specify a Signup Form in the Membership Signup options, PORTALPRODIGY
will use the default Signup Form specified in Feature Management for User
Signup.
In the tab section For More
Information, specify a contact person and their contact phone number and
email.This information will be
displayed on the Membership details page in the visitor portion of the
Website, including a link to automatically generate an email.
In the tab section Membership Groups,
specify which Security Group that PORTALPRODIGY should automatically
assign the Member to, for each condition.
In the tab section Make Checks Payable
To, enter the name that checks should be made out to and the address they
should be sent to.This will be
displayed on the Membership Payments page during the membership signup
process.
In the tab section Fee Options set the
parameters to determine how the membership fees will be billed.
Only set Initial Terms when
Pay On Account is allowed.
If the Membership Type
includes Renewal or Recurring Fees, then select a Recurring Terms and
specify in Enter the Days To Bill Before Due, how many days prior to the
terms due date to print invoices.
Set the options for
Prorating and Locking Fees.
Set the Dues Anniversary
option to determine when the membership starts.
If Member Applicants
require approval before the can become members, then enter into Days to
Approve the average number of days it takes to process applications.
In the tab section Accepted Payment
Methods select each payment method to be available to membership
applicants.
In the tab section Membership
Notifications select the notification to be used for sending emails for
each condition.These are used to
specify the email template to be used by the Auto Broadcaster.
In the tab section Fee Types, define
the Fee Types applicable to the Membership Type.A Membership Type may have one
Initiation Fee, one Recurring Fee, one or more Recurring Fee options from
which the member applicant must select one, and one or more optional Other
Fees from which the member applicant can select none to all.Note that the edit options for each Fee
Type are not available until after saving the new Membership Type for the
first time.So, click , which
is located at the bottom of the page.
To charge an Initiation Fee:
Click on the icon to the right of the Initiation
Fee.This will display the Items
Management page.
Leave Type set to Service.
In Item Name you may replace Initiation Fee with a different
name.
In Price enter the fee amount.
Leave Default Item set to No.
Leave Product Type set to Initial.
Set the Interval for the Initiation
Fee.If the Initiation Fee is not
for a specific period then do not select an Interval.E.g. “Lifetime Membership”.Note that once you clicked on an Interval
and saved the Fee Item, you cannot reset to no Interval.
If Days is selected as the Interval,
then enter the number of days into the Days field.
If the Membership starts on a specific
day of the year other than the Calendar or your Fiscal Year, then specify
a Start Date; otherwise leave Start Date empty.Start Date only uses the day and month,
ignoring the year of the date.
Set the Prorate and Include Next
Period options.It is suggested
that Prorate only be set to Yes,
when the Recurring Fee is equal to or greater than the Initiation Fee;
otherwise it is suggested to leave Prorate set to No, especially when the Interval is equal to a year or
greater.
If the PORTALPRODIGY GL Journal
Entries feature is enabled select the applicable GL Accounts.
Click and confirm save.
To charge a Renewal Fee:
Click on the icon to the right of the Renewal
Fee.This will display the Items
Management page.
Leave Type set to Service.
In Item Name you may replace Renewal with a different name.
In Price enter the fee amount.
Leave Default Item set to No.
Leave Product Type set to Renewal.Note that the Renewal Fee’s Interval is
automatically set to the same Interval as the Initiation Fee.
If the PORTALPRODIGY GL Journal
Entries feature is enabled select the applicable GL Accounts.
Click and confirm save.
To add a Recurring Fee:
Click on the icon to the right of the Recurring
label.This will display the Items
Management page.
In Item Name enter the name for the
Recurring Fee.
In Price enter the fee amount.
Leave Default Item set to No.
Leave Product Type set to Recurring.
Set the Interval for the Recurring Fee
option.
If Days is selected as the Interval,
then enter the number of days into the Days field.
Leave Start Date empty.
Set the Prorate and Include Next
Period options.
If the PORTALPRODIGY GL Journal
Entries feature is enabled select the applicable GL Accounts.
Click and confirm save.
To add an Other Fee:
Click on the icon to the right of the Other Fee
label.This will display the Items
Management page.
Leave Type set to Service.
Enter an Item Name.
In Price enter the fee amount.
Leave Default Item set to No.
Leave Product Type set to Other.Note that the Other Fees do not have
Intervals.They are one time fees
that are billed as part of the initial Membership billing (Order).
If the PORTALPRODIGY GL Journal
Entries feature is enabled select the applicable GL Accounts.
Click and confirm save.
When finished defining the
Membership, click located at the bottom of the Membership Types
Management page and confirm save.