Used to enter payments and distribute payments to
orders/invoices.
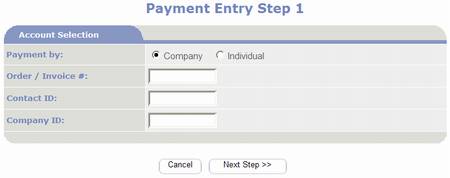
Payment Entry Step 1:
§
Payment
by: select the payee type as either Company
or Individual. The default selection is Company.
§
Order /
Invoice #: if known enter the Order Number.
§
Contact
ID: if known enter the Contact ID.
§
Company
ID: if known enter the Company ID.
§
 : use to cancel the payment entry. Closes the page without saving anything.
§
 : use
to proceed to the next step of the payment entry process. The next step is dependent on the information
entered in step 1. If either
Order/Invoice#, Contact ID, or Company ID are entered; the Search for
Contacts/Companies step is skipped.
: use
to proceed to the next step of the payment entry process. The next step is dependent on the information
entered in step 1. If either
Order/Invoice#, Contact ID, or Company ID are entered; the Search for
Contacts/Companies step is skipped.
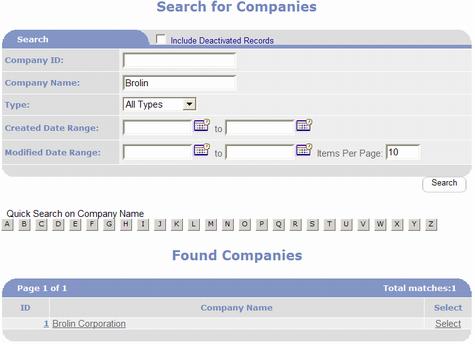
Search for
Companies:
This step occurs when you set Step 1: Payment By to Company.
The purpose of this step is to identify the payee.
§
ID –
this column lists the Company IDs as links that when clicked on displays the companies’
record in the Company Management page.
When a Company Name is listed without an ID, this means that the company
name was entered into a contact record but a company record has not been
created.
§
Company
Name – this column lists the company names.
When the Company Name is listed as a link (underlined) this means a
company record has been created for the company and you may click on the link
to retrieve the company record in the Company Management page. If the Company Name is listed without link
(not underlined), this means the company name was entered into a contact record
but a company record has not been created.
See Contact Management feature for additional information.
§
Select
– click on the select link to select the company and proceed to Payment Entry
Step 2.
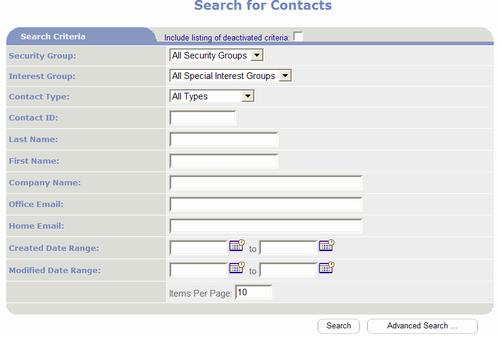
Search for
Contacts:
This step occurs when you set Step 1: Payment By to Individual. The purpose of this step is to identify the
payee.

§
ID –
this column lists the IDs as links that when clicked on displays the contact’s
record in the Company Management page.
§
Contact
Name – this column lists the contact names as links that when clicked on displays
the contact’s record in the Company Management page.
§
Select
– click on the select link to select the contact and proceed to Payment Entry
Step 2.
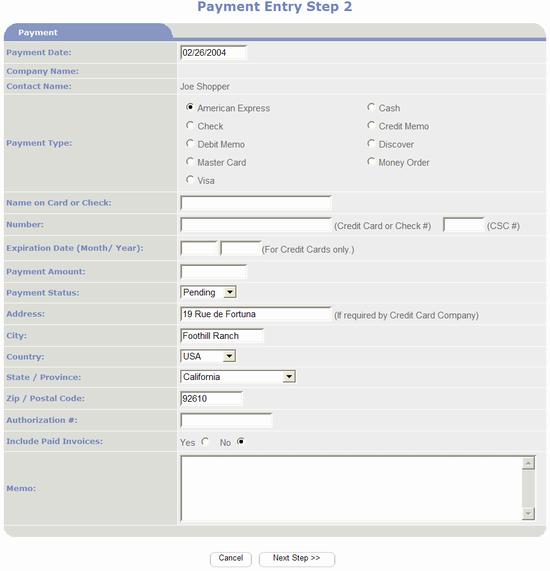
Payment Entry
Step 2
§
Payment
Date: defaults to the current date.
Typically this is used to record the date the payment was received.
§
Company
Name: if the payee is a company, the
companies name is displayed here.
§
Contact
Name: if the payee is an individual, the individuals name is displayed
here.
§
Payment
Type: select one from one of the
available payment types. Payment types enabled
in Payments Feature Management.
§
Name on
Card or Check: enter the name exactly as it is printed on the check or
credit card.
§
Number: enter the credit card number or the check
#. When the payment type is set to a
credit card, a number is required. PORTALPRODIGY will verify the correct starting
number and quantity of digits based on the type of credit card. When entering checks, the check number is
optional.
§
CSC#:
optional input used for credit card payments only. Some credit card processor requires CSC
verification. This is a number that is
typically printed on the back of the credit card and is used as an extra
security precaution to minimize fraudulent use of credit cards.
§
Expiration
Date (Month /Year): if payment is by
credit card, a credit card expiration date is required. Enter the month using numbers, e.g. 1 for
Jan., 12 for Dec. The year should be
entered as a 4 digit number, e.g. 2007.
§
Payment
Amount: enter the dollar amount of
the payment. Cents are entered using a
decimal, e.g. enter 9.95 for $9 and 95 cents.
§
Payment
Status: when the selected payment
type requires authorization this field is used to set and track the
authorization status. The default value
is Pending. This value can be changed to either Approved or Declined. Orders requiring
pre-payment prior to fulfillment/shipment require the applied payments to have
their Payment Status set to Approved. If you will be entering an authorization
number, this field can be left blank. When PORTALPRODIGY processes the payment
it will automatically set the Payment Status to Approved when an authorization number has been entered.
§
Address: for credit card payments, if your processor
requires address verification, you must enter the billing address for the
credit card. Enter the street address
into this field.
§
City: for credit card payments, if your processor
requires address verification, you must enter the billing address for the
credit card. Enter the City into this
field.
§
Country: for credit card payments, if your processor requires
address verification, you must enter the billing address for the credit
card. Enter the Country into this
field. It defaults to the value
specified in User Signup Features Management.
§
State
/Province: for credit card payments,
if your processor requires address verification, you must enter the billing
address for the credit card. When
country is set to USA,
Canada or Mexico,
this field is displayed as a list box listing the corresponding
States/Provinces. For all other
countries the field is set to a text box.
It defaults to the value specified in User Signup Features Management.
§
Zip /
Postal Code: for credit card payments, if your processor requires address
verification, you must enter the billing address for the credit card. Enter the Zip /Postal Code into this field.
§
Authorization
#: used to enter either the check or
credit card authorization number provided by your processor or banking
institution.
§
Include
Paid Invoices: defaults to No.
Set to Yes, when you want to
view Paid Orders/Invoices on the Payment Distribution page.
§
Memo: use this for internal purposes to record
notes about the payment. This field is
useful for noting problems settling the payment.
§
: use to cancel the payment entry. Closes the page without saving anything.
§
: use
to proceed to the next step of the payment entry process which is paymet
distribution.
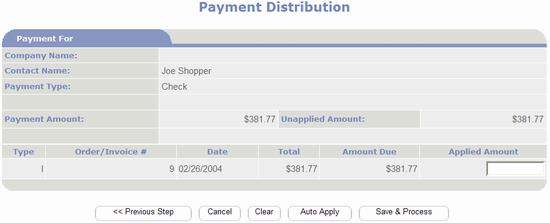
Payment
Distribution:
Used to apply payment to
Orders/Invoices. Payments that are
entered at the time an Order is entered are automatically applied to the Order. Payments entered using Payment Entry feature
are applied using this process which allows a single payment to be distributed
to multiple orders/invoices.
§
Company Name: lists the customer’s name.
§
Contact Name:
lists the contact’s name.
§
Payment Type: lists the payment type entered in
Step 2.
§
Payment Amount: lists the total amount of the
payment entered in Step 2.
§
Unapplied Amount: lists the amount of the payment that has not
been distributed.
Grid listing all Order/Invoices for the
selected customer including previous payment distributions if this option was
selected in Step 2.
§
Type:
indicates the order type. I = Invoice, D
= Debit Memo, C = Credit Memo.
§
Order/Invoice
#: lists the Order number the
distribution was made to.
§
Date:
list the date the distribution was made.
§
Total:
lists the total amount of the order.
§
Amount
Due: lists the unpaid amount of the order.
§
Applied
Amount: this is where you enter the
amount of the payment to apply to the Order listed on the row. Negative values can be entered to reverse
previous distributions. The Auto Apply
option can be used to auto fill this field.
§
 : click on this to return to Payment Entry
Step 2 page where you can make changes, then return to this page.
: click on this to return to Payment Entry
Step 2 page where you can make changes, then return to this page.
§
: use to cancel the payment entry. Closes the page without saving anything.
§
 : use to clear applied amounts.
§
 : use to automatically apply the payment
starting with the oldest invoice first, applying to subsequent invoices in
chronological order until the payment amount is fully distributed. Any remaining unapplied amount is stored as a
credit memo.
: use to automatically apply the payment
starting with the oldest invoice first, applying to subsequent invoices in
chronological order until the payment amount is fully distributed. Any remaining unapplied amount is stored as a
credit memo.
§
 : used when finished with distribution to go to
next step.
: used when finished with distribution to go to
next step.
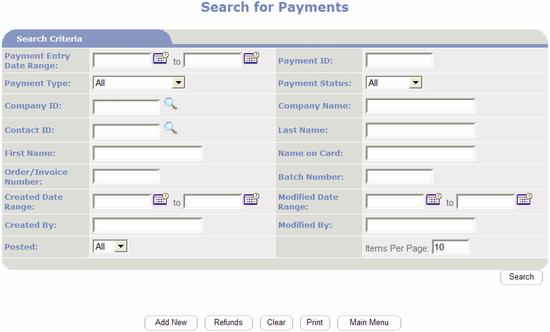
Search
for Payments:
Used to search and retrieve payments
that were previously entered.
§
Payment Entry Date Range: this searches on the date entered.
§
Payment
ID: this searches on the unique
record ID assigned to each payment.
§
Payment
Type: defaults to All. Provides option to search for a specific
payment type. The following payment
types are available:
o American
Express
o Cash
o Check
o Credit
Memo
o Debit
Memo
o Discover
o Master
Card
o Money
Order
o Refund
o Visa
§
Payment
Status: default to All. Provides
option to search for a specific status.
The following types are available:
o Approved
o Declined
o Pending
§
Company
ID: Provides option to search on
Company ID of payee.
§
Company
Name: Provides option to search on the Company Name of the payee.
§
Contact
ID: Provides option to search on the
Individual’s Contact ID of the payee.
§
Last
Name: Provides option to search on the Contact/payee’s Last Name.
§
First
Name: Provides option to search on the Contact/payee’s First Name.
§
Name on
Card: Provides option to search on the cardholder’s name.
§
Order /
Invoice Number: Provides option to search on Orders / Invoices the payment
has been distributed to.
§
Batch
Number: Provides option to search on
the payment posting batch number.
§
Created Date
Range – this searches on the date that is
automatically stored by the system when the payment record is created.
§
Modified Date
Range – this
searches by date last modified range.
Works the same as Created Date
Range.
§
Posted: defaults
to All. Setting to No eliminates posted payments from being retrieved. Set to Yes
to only include posted payments.
§
Items Per
Page – used to control how many matches are listed at a time. Defaults to 10. If the number of matches
is greater than the specified Items Per Page, PORTALPRODIGY provides navigation
options for the additional pages of matches This feature minimizes network
traffic.
Options:
|

|
Submits criteria to server and returns matching Payments.
|
|

|
Opens the Payment Entry Step 1 page to add a new payment.
|
|

|
Opens the Refund page.
|
|

|
Clears the search criteria.
|
|

|
Prints the website page to the user’s local printer.
|
|

|
Closes the page and returns to the Site Administration
Menu.
|


