Used from administration to create and process credit
applications.
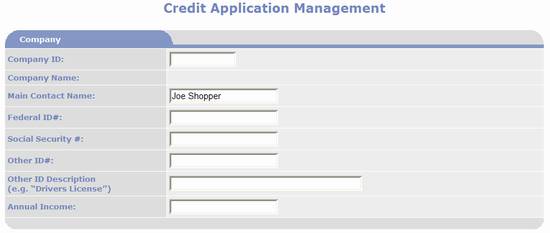
Company Section:
§
Company
ID: If the application is for a
Company, enter the unique Company ID assigned by PORTALPRODIGY.
§
Company
Name: If a Company ID was entered,
PORTALPRODIGY displays the Company Name.
§
Main
Contact Name: This is copied from
the Contact record and may be changed.
§
Federal
ID#: text field for entering a
Federal ID value.
§
Social
Security #: text field for entering
a Social Security value.
§
Other
ID#: text field for entering and ID
such as a Drivers License, Passport Number, etc.
§
Other ID
Description: text field for entering
a description of the type of ID used for Other ID.
§
Annual
Income: currency field for entering
annual income as a dollar amount.
Amounts entered with cents are rounded to nearest dollar amount.
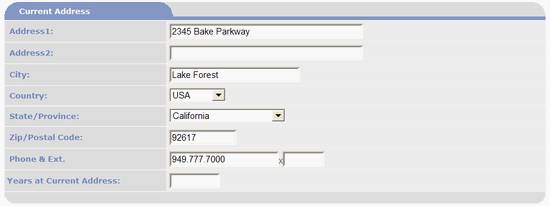
Current Address and Previous Address Sections:
§
Address 1
- enter the street address.
§
Address 2
- used when a second line is needed for the street address.
§
City:
enter the address City.
§
Country
– defaults to value specified in User Signup Features Management. List box lists all Countries that have been
activated in Countries Feature Management.
§
State/Province
– defaults to value specified in User Signup Features Management. If
Country is USA,
Mexico or Canada,
it lists the States/Provinces, for all other countries the list box is replaced
with a text box.
§
Zip/Postal
Code - enter the address postal Zip code
§
Years at
Current/Previous Address - enter the years the person lived at this address
as integer value. Decimals are rounded
to nearest whole number.
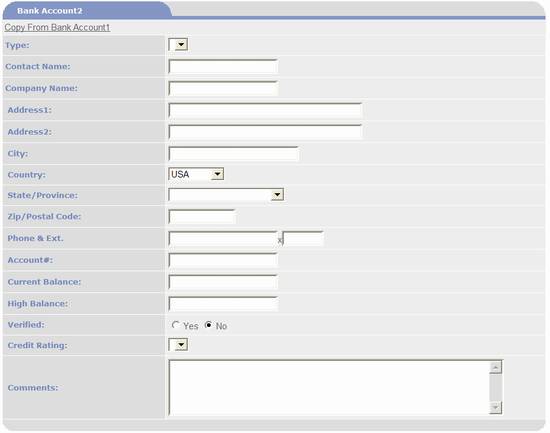
Bank Account 1
and Bank Account 2 Sections:
These two sections are for providing account
information for deposit accounts such as checking or money markets.
§
Copy
from Bank Account1 – this is a time saver that copies field values from
Bank Account1 section. Often a person
will have two or more accounts with the same Bank.
§
Type
– used to select a pre-defined value from list.
Bank Account Types are defined using Bank Account Type Management. Example values may include Checking, Savings, Money Market, etc.
§
Contact
Name – enter the contact persons name at the bank. Both first and last name are entered into
this field.
§
Company
Name – enter the name of the bank.
§
Address 1
- enter the Banks mailing street address.
§
Address 2
- used when a second line is needed for the street address.
§
City - enter
the mailing address City.
§
Country
– defaults to value specified in User Signup Features Management. List box lists all Countries that have been
activated in Countries Feature Management.
§
State/Province
– defaults to value specified in User Signup Features Management. If
Country is USA,
Mexico or Canada,
it lists the States/Provinces, for all other countries the list box is replaced
with a text box.
§
Zip/Postal
Code - enter the mailing address postal Zip code
§
Phone
& Ext. – enter the Bank Contact person’s phone number and phone
extension.
§
Account #
- enter the account number of the account.
§
Current
Balance – enter the current dollar amount in this account.
§
High
Balance – enter the highest dollar amount for this account.
§
Verified
– Yes and No radio buttons used to track account verification process. Default to No. Once the account has been verified to exist,
set to Yes.
§
Credit
Rating – used to select a predefined value from list. Values are defined using Credit Rating Management. Example values may include Paid as Agreed, Late Payments, Frequently
Late, In Default.
§
Comments
– used to enter textual comments about the accounts history, status and credit
rating.
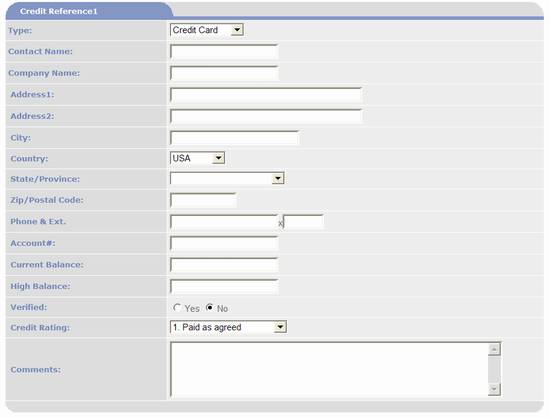
Credit Reference 1-3 Sections:
These three sections are for
providing information about borrowings.
§
Type
– used to select a pre-defined value from list.
Credit Types are defined using Credit Type Management. Example values may include Credit Card, Mortgage, Unsecured Loan,
etc.
§
Contact
Name – enter the contact persons name at the credit institution. Both first and last name are entered into
this field.
§
Company
Name – enter the name of the credit institution.
§
Address 1
- enter the credit institution’s mailing street address.
§
Address 2
- used when a second line is needed for the street address.
§
City - enter
the mailing address City.
§
Country
– defaults to value specified in User Signup Features Management. List box lists all Countries that have been
activated in Countries Feature Management.
§
State/Province
– defaults to value specified in User Signup Features Management. If
Country is USA,
Mexico or Canada,
it lists the States/Provinces, for all other countries the list box is replaced
with a text box.
§
Zip/Postal
Code - enter the mailing address postal Zip code.
§
Phone
& Ext. – enter the credit institution’s Contact person’s phone number
and phone extension.
§
Account #
- enter the account number of the account.
§
Current
Balance – enter the current dollar amount owed for this account.
§
High
Balance – enter the historical highest dollar amount owed for this account.
§
Verified
– Yes and No radio buttons used to track account verification process. Default to No. Once the account has been verified to exist,
set to Yes.
§
Credit
Rating – used to select a predefined value from list. Values are defined using Credit Rating Management. Example values may include Paid as Agreed, Late Payments, Frequently
Late, In Default.
§
Comments
– used to enter textual comments about the accounts history, status and credit
rating.
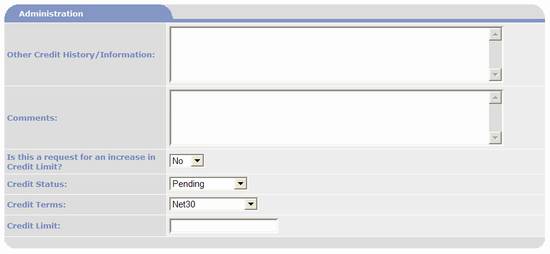
Administration Section:
Used as part of the approval
process to capture notes and record outcome.
§
Other
Credit History/Information – enter additional accounts and credit
information here.
§
Comments
– enter comments about credit verification here.
§
Is this a
request for an increase in Credit Limit? – set to Yes when the customer already has credit and is asking for an
increase in the amount; otherwise leave set to No.
§
Credit
Status – the following fields are used to track the status of the credit
application and to trigger record updates:
o
Pending
– PORTALPRODIGY assigns this value when the application is submitted by the
customer/visitor or when it is created by an Administrator.
o
Approved
– when this value is selected, PORTALPRODIGY updates the applicants account record
assigning them the Terms and Credit Limit specified below.
o
Declined
– select this value when the application is disapproved.
o
Not
Completed – PORTALPRODIGY assigns this value when the customer/visitor has
not completed their application. I.e.
They have saved it but not submitted it as completed.
§
Credit
Terms – used to assign credit terms.
Select one of the pre-defined Credit Terms. Credit terms are defined using Credit Terms
Management.
§
Credit
Limit – enter the credit limit dollar amount. This amount is copied to the customer’s
account when the application is approved.
Record Section:

§
Credit
AppID – the unique record ID assigned by PORTALPRODIGY.
§
Created
By – the name of the user that created the record and the date it was
created. Lists user’s first name
followed by last name.
§
Modified
By – the name of the user that last modified the record and the date it was
last modified. Lists user’s first name
followed by last name.
§
Active
– by default this value is set to “Yes”, which means the record is active and
available for use. To deactivate a
record, set it to “No”. Deactivating a
record is a logical form of deletion. It
is used to remove the record from future use, yet maintain the relationship
with existing data. Reports by default
only include active records; however, there is a reporting option that allows
inclusion of deactivated records.


