PortalProdigy Server and Site Configuration Guide
Last updated April
11, 2007
This guide will instruct you
how to configure your PortalProdigy Server and Site. The instructions vary
slightly depending on whether you are (A) setting up a live site with an actual
domain name (e.g. www.portalprodigy.com)
or (B) setting up a trial site without a domain name.
For option (B) you will use the
IIS localhost feature that allows you to operate a website using the name of
your computer rather than a domain name. If you are installing PortalProdigy
on a computer running Windows XP Professional you will be using option (B). Using
option (B) you can access your website from the computer it is installed on
(“the server”), as well as from any computer that can access “the server” by
either computer name or by IP address. For additional information see your
Windows Operating System manuals.
Supported Operating Systems:
PortalProdigy Server operates
on the following Operating Systems:
- Windows XP Professional (use
for trial only as XP is not suitable as a live webserver) with Service
Pack 2.
- Windows 2000 with Service
Pack 4.
- Windows 2003 Web Edition,
Server Edition, or Advanced Server Edition; with service Pack 1.
Windows 2003 Web Edition is the
recommended Operating System.
Supported Browsers:
Administration of PortalProdigy
should be done using Internet Explorer 6 with Service Pack 2.
Pre-requisite:
Prior to performing the steps
outlined in this guide you must run the PortalProdigy.exe to install the
PortalProdigy server components and create a website on your server. Before
running PortalProdigy.exe we recommend that you first read this guide, as it
will prepare you to respond to the questions asked during the PortalProdigy.exe
installation process.
During the PortalProdigy.exe
installation process we recommend the following responses:
1)
When prompted for a location:
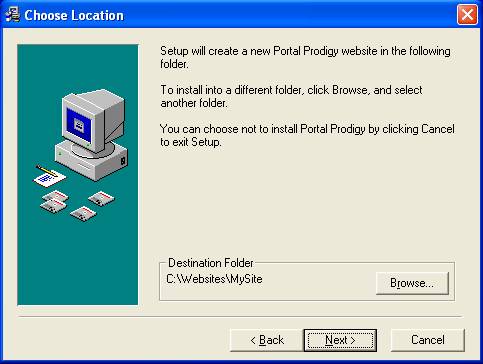
a)
If you have a drive d: or e: we recommend locating your website in a
folder located on your drive d: or e: otherwise place it on drive c:
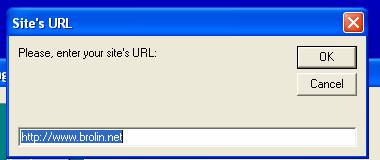
2)
When prompted to enter your website’s URL:
a)
Consider the following:
i)
Are you setting up a live site with an actual domain name?
or
ii)
Are you setting up a trial site without a domain name?
b)
If you are setting up a live site, simply enter the domain name when
prompted for the Site’s URL as per the above picture.
c)
If you are setting up a trial site without a domain name, you will be
running your site using the IIS localhost feature as the default site and will
need to enter your computers full computer name when prompted for the Site’s
URL, as per the above picture. Your computer’s full computer name can be
ascertained by opening the System Properties window shown below.
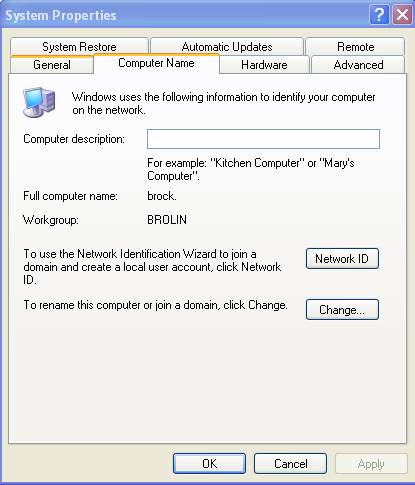
d)
The full computer name in the System Properties window shown above is
“brock”. Thus for this computer, you would enter “http://brock” when prompted
for the Site’s URL. If you already have a website configured as the default website
you may append a short name to the computer name such as “mywebsite” thus
entering “brock/mywebsite” when prompted for the Site’s URL.
Configuration Overview:
This guide will take you step
by step through each of the following processes:
1)
Configure Windows settings including folder/file access rights.
2)
Modify IIS Metabase.xml file (Windows XP and Windows 2003 only).
3)
Create and configure site in IIS including setting IIS folder/file
access rights.
4)
Setup & configure Broadcasting Components.
5)
Schedule nightly utilities using Windows Scheduler.
6)
Start MakeZip.exe.
7)
Access your website.
Please note that your Windows
installation may vary from the examples provided in this guide. This guide
presumes the reader has sufficient knowledge of Windows to deviate from the
instructions as necessary. If not, PortalProdigy can recommend an IBCA that
can assist you with your installation. Please see www.portalprodigy.com for more
information.
Configure Windows settings
including folder/file access rights:
1)
If you have installed PortalProdigy on Windows XP Professional, you will
need to disable Simple File Sharing; otherwise skip to Step 2.
a)
In Windows XP the default setting is simple sharing (Security Tab is
hidden). In order to set security rights you need to uncheck Simple File Sharing.
Open Windows Explorer > click Tools > click Folder Options > click
View Tab and uncheck “Use simple file sharing” as shown below:
2)
Set Environmental Variables - IUSR and IWAM accounts need full security
rights to temp folder specified in windows environmental variables. We suggest
pointing this to folder on drive D. We also suggest placing all websites on
drive D.
a)
First check to see if you have a “c:\temp” or “d:\temp” folder. If not,
create one. If you have more than one internal hard drive it is preferable to
place the temp folder on a drive other than “c:”. If you only have one internal
drive, then place it on “c:”.
b)
Click Start > Control Panel > System
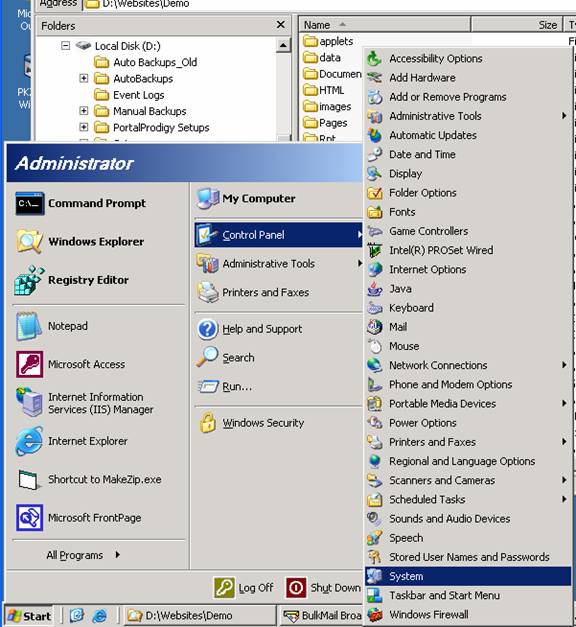
c)
System Properties window > Advanced tab:
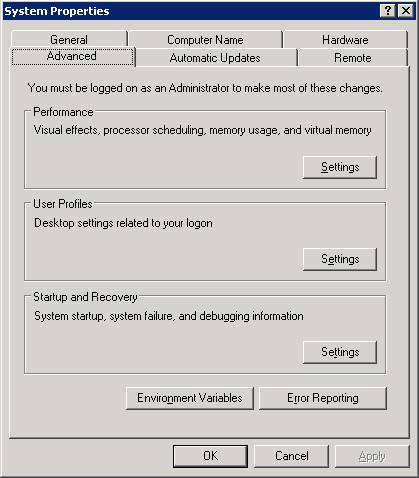
d)
Click Environment Variables.
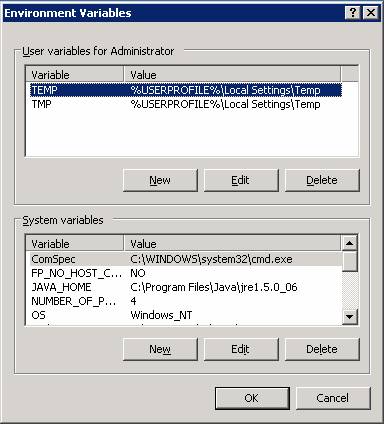
e)
Edit both Temp and TMP and set to “c:\temp” or “d:\temp” or other
internal drive where you placed “\Temp” folder.

f)
Click Ok to save. Continue to click close for each window.
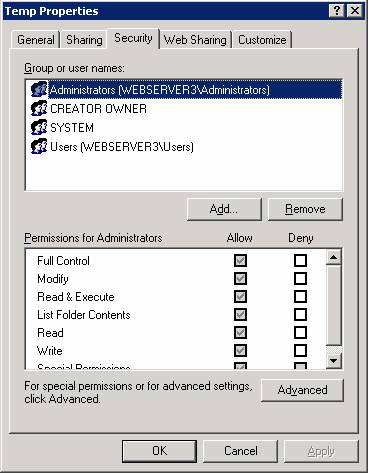
g)
Using Windows Explorer go to your temp folder, either “c:\temp” or
“d:\temp” and right click on the folder, then select Properties.
h)
Select the Security tab.
i)
Click Add.
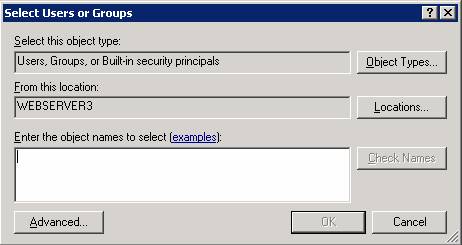
j)
Click Advanced.
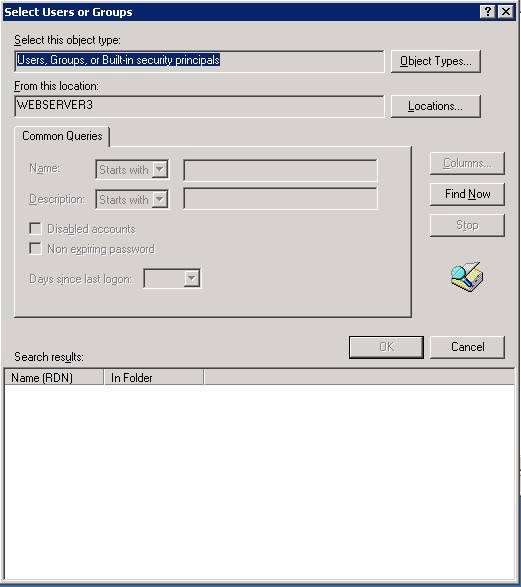
k)
Click Find Now.
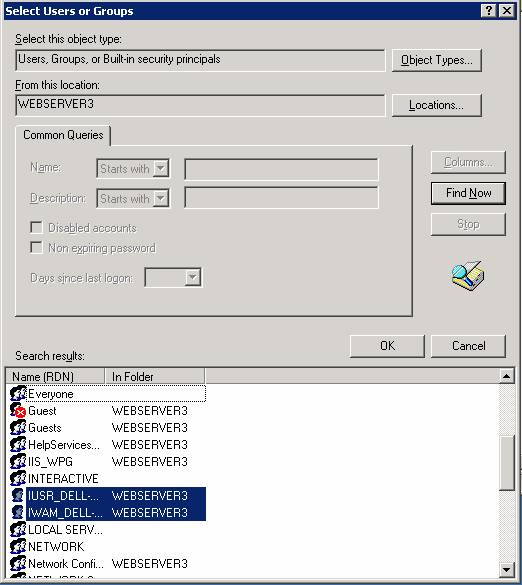
l)
Highlight IUSR and IWAM accounts as shown above then click OK.
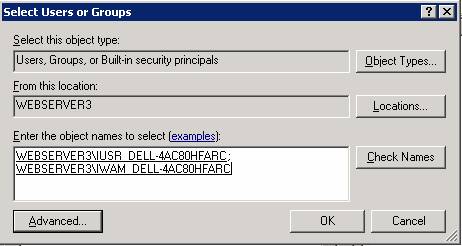
m)
Click OK.
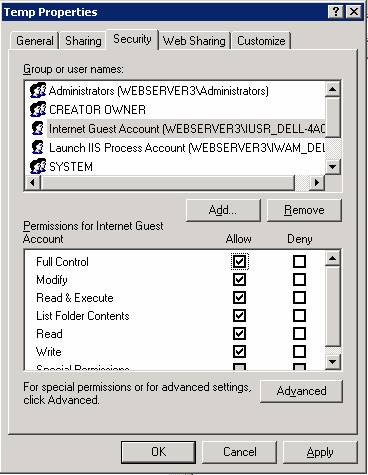
n)
Highlight IUSR (Internet Guest Account) and check “Full Control”.
o)
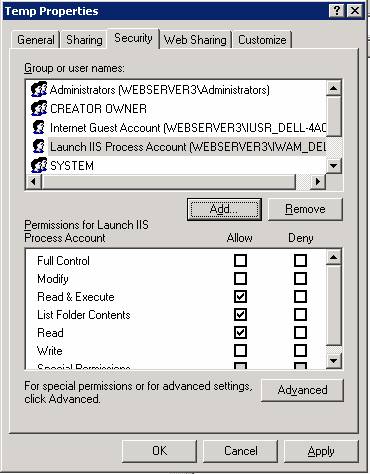
Highlight IWAM (Launch IIS Process Account) and check “Full Control”.
p)
Click OK.
3)
Set permissions for “CMD.exe” located in C:\Windows\System32 folder to
include IUSR (Internet Guest Account) with “Read & Execute” permission as
follows:
a)
Using Windows Explorer go to your C:\Windows\System32 folder, locate the
file “CMD.exe” and right click on it, then select Properties.
b)
Select the Security tab.
c)
Click Add.
d)
Click Advanced.
e)
Click Find Now.
f)
Highlight both IUSR (Internet Guest Account) and IWAM (Launch IIS
Process Account) and click OK.
g)
Click Ok, again.
h)
Highlight IUSR (Internet Guest Account) and check “Read & Execute”.
i)
Highlight IWAM (Launch IIS Process Account) and check “Read &
Execute”.
j)
Click OK.
4)
Set permissions for C:\ProgramFiles\CommonFiles\Brolin folder (created
by PortalProdigy.exe installation) to include IUSR (Internet Guest Account)
with “Modify”, “Read & Execute”, “Read”, and “Write” permission as follows:
a)
Using Windows Explorer go to your C:\ProgramFiles\CommonFiles\Brolin
folder and right click on it, then select Properties.
b)
Select the Security tab.
c)
Click Add.
d)
Click Advanced.
e)
Click Find Now.
f)
Highlight IUSR (Internet Guest Account) and click OK.
g)
Click Ok, again.
h)
Highlight IUSR (Internet Guest Account) and check each of the following:
i)
“Modify”
ii)
“Read & Execute”
iii)
“Read”
iv)
“Write”.
i)
Click OK.
5)
Set permissions for C:\Program Files\Common Files\Brolin\Zip (created by
PortalProdigy.exe installation) to include IUSR (Internet Guest Account) with
“Modify”, “Read & Execute”, “Read”, and “Write” permission as follows:
a)
Using Windows Explorer go to the C:\Program Files\Common
Files\Brolin\Zip folder and right click on it, then select Properties.
b)
Select the Security tab.
c)
Click Add.
d)
Click Advanced.
e)
Click Find Now.
f)
Highlight IUSR (Internet Guest Account) and click OK.
g)
Click Ok, again.
h)
Highlight IUSR (Internet Guest Account) and check each of the following:
i)
“Modify”
ii)
“Read & Execute”
iii)
“Read”
iv)
“Write”.
i)
Click OK.
6)
Set permissions for your website. You will set your website to include
“Full Control” for both IUSR (Internet Guest Account) and Everyone as follows:
a)
Using Windows Explorer go to your website’s root folder, e.g.
“D:\Websites\MySite”, and right click on it, then select Properties.
Your website’s root folder is the Destination Folder that you
specified in the Choose Location window during the PortalProdigy.exe
installation shown below.
b)
Select the Security tab.
c)
Click Add.
d)
Click Advanced.
e)
Click Find Now.
f)
Highlight both IUSR (Internet Guest Account) and Everyone then click OK.
g)
Click Ok, again.
h)
Highlight IUSR (Internet Guest Account) and check “Full Control”.
i)
Highlight Everyone and check “Full Control”.
j)
Click OK.
Modify IIS Metabase.xml file
(Windows XP and Windows 2003 only):
By default IIS is set to allow
maximum file upload size of only 200K. The following instructs you how to set
it to the largest setting supported by IIS. We also recommend changing the ASP
buffering size. It defaults to 4MB.
1)
Using the IIS Console select the server name.
2)
Right click and select Properties
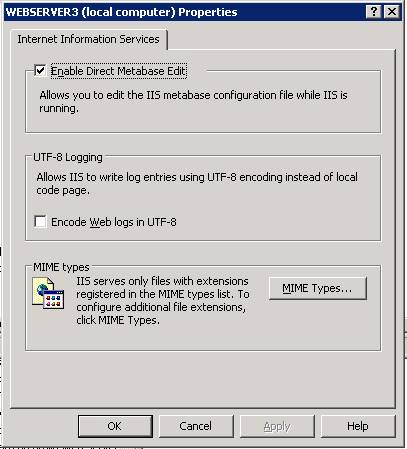
3)
Check “Enable Direct Metabase Edit” and click Ok.
4)
Using Windows Explorer go to “C:\Windows\system32\inetsrv” and open “Metabase.xml”
in Notepad.
5)
Select Edit then select Find.
6)
Enter “AspMaxRequestEntityAllowed” in the text box and click Find.
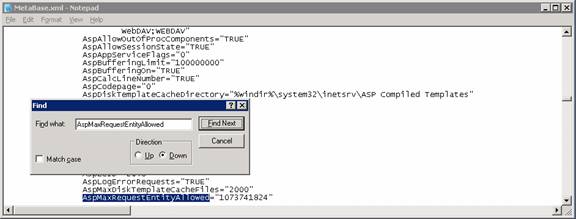
7)
After it finds the value, click Cancel to close the Find dialog box.
8)
Set the value to "1073741824" as follows: AspMaxRequestEntityAllowed="1073741824"
9)
Go to the top of the file. You can do this by clicking Ctrl-Home.
10)
Select Edit then select Find.
11)
Enter “AspBufferingLimit” in the text box and click Find.
12)
After it finds the value, click Cancel to close the Find dialog box.
13)
Set the value to "100000000" as follows: AspBufferingLimit="100000000"
14)
Save and Close the file.
Create and configure site in
IIS Console:
Using IIS Console you need to
create your site and configure it as follows:
1)
To create the website:
a)
Select “Websites” and right click. Select New then select Web Site as
shown below.
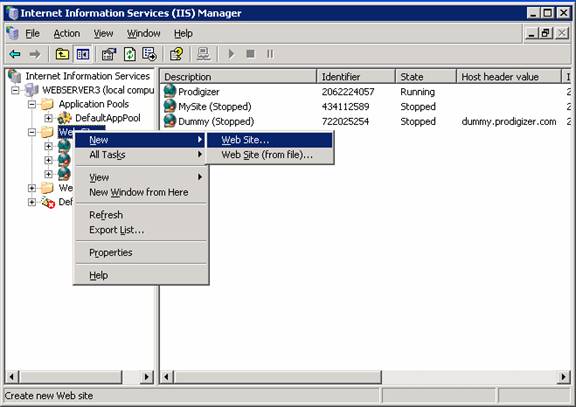
b)
Follow the steps presented by the Wizard

c)
Click Next.

d)
Enter a name for your website then click Next.
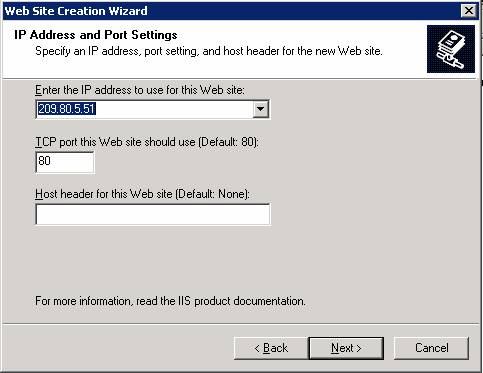
e)
Select your IP from the list box. Leave the Port set to 80. In the
Host Header text box enter the same domain name (URL) you entered during
PortalProdigy Setup. E.g. “www.mysite.com”.
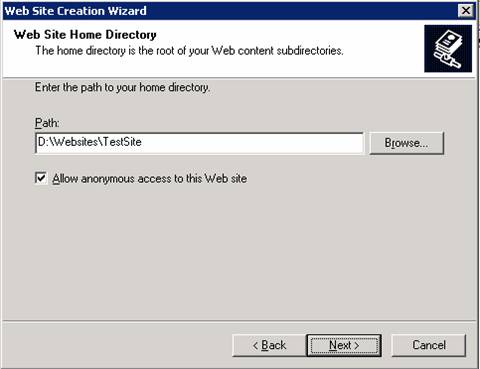
f)
Use the Browse button to select the website root folder that was created
during the PortalProdigy.exe installation, then click Next.
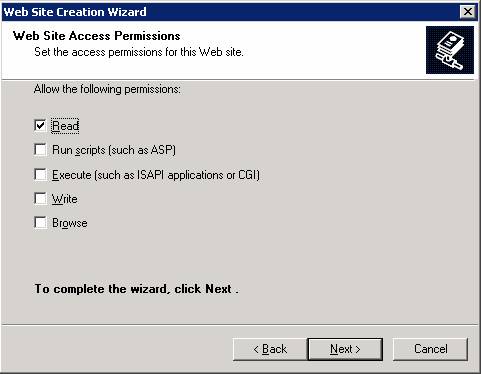
g)
For Web Site Access Permissions check “Read” and leave all others
unchecked.
h)
Click Finish button.
2)
Configure Website Properties:
a)
Select the website and right click on it, then select Properties.

b)
No changes to Web Site tab are necessary. Click Home Directory tab:
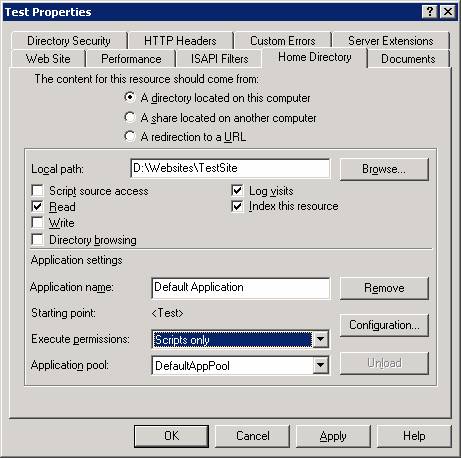
c)
Set Execute Permissions to “Scripts only” then click Ok.
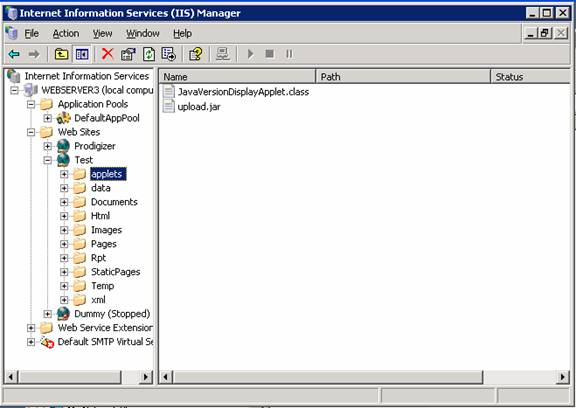
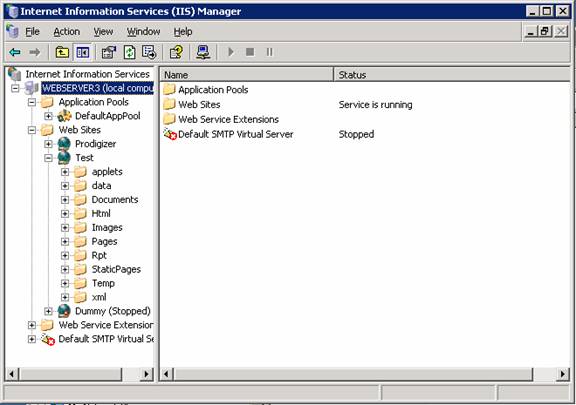
d)
Your website will be listed in the IIS console as shown in the picture
above.
e)
Click on your website’s + sign to expand it.
f)
You will now override the permissions for the Data, Documents, Pages,
Rpt, Temp, and XML folders as follows:
i)
Right click on the Data folder and select Properties.
ii)
Select the Directory tab.
iii)
Uncheck Read then click Ok.
iv)
Right click on the Documents folder and select Properties.
v)
Select the Directory tab.
vi)
Uncheck Read then click Ok.
vii)
Right click on the Pages folder and select Properties.
viii)
Select the Directory tab.
ix)
Uncheck Read then click Ok.
x)
Right click on the Rpt folder and select Properties.
xi)
Select the Directory tab.
xii)
Uncheck Read then click Ok.
xiii)
Right click on the Temp folder and select Properties.
xiv)
Select the Directory tab.
xv)
Uncheck Read then click Ok.
xvi)
Right click on the XML folder and select Properties.
xvii)
Select the Directory tab.
xviii)
Uncheck Read then click Ok.
g)
The other folders require Read permission and will inherit this from the
website’s root folder.
Setup & configure
Broadcasting Components:
If you want to send email from PortalProdigy, including
automated notifications, then you need to complete this step, which will guide
you through the process of setting up PortalProdigy’s broadcasting components.
It requires that Sun Microsystems Java version 5.0 or higher be installed on
your server (note that it is sometimes referred to as version 1.50). If you
are setting up trial site, unless it is important for you to evaluate
PortalProdigy’s broadcasting features, we suggest skipping setup and configuration
of Broadcasting Components. You may configure the Broadcasting Components at
any time.
1)
Verify that you have Sun Java version 5.0 or higher installed. If not,
go to http://java.com/en/download/index.jsp
to download and update; otherwise skip to the next step. Be sure to restart
your server after Java new install or update.
2)
Copy all jar files from C:\Program Files\Common Files\Brolin\Java to
C:\Program Files\Java\%%JRE%%\lib\ext where %%JRE%% is substituted by the latest
JRE (Java release) folder name such as “jre1.5.0_06” that is installed on your
server.
3)
Create a System DSN for the BroadcastingBoard.mdb:
a)
Click Start > Administrative Tools >Data Sources (ODBC)
b)
Click the System DSN tab.
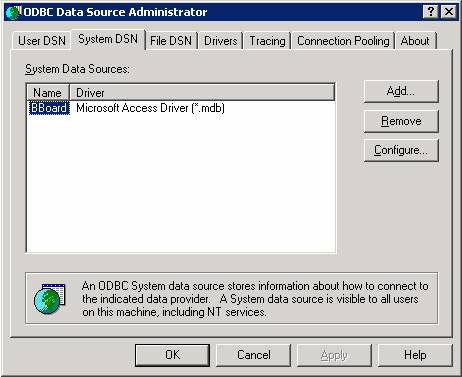
c)
Click Add.
d)
Select the driver “Microsoft Access Driver (*.mdb).
e)
Click Finish.
f)
Set Data Source Name to “BBoard”.
g)
Browse and select the database at C:/Program Files/Common Files/Brolin/data/
BroadcastingBoard.mdb.
h)
Click Ok to save.
4)
Using Notepad, open the file “C:\Program Files\Common
Files\Brolin\Java\bulkmail\bulkmail.properties” and update the IP address for
the SMTP host. Set the IP address to your SMTP sever. Save and close
bulkmail.properties file.
5)
Create shortcut and place on desktop for “C:\Program Files\Common
Files\Brolin\Java\bulkmail\bulkmail.bat”.
6)
Create shortcut and place on desktop for “C:\Program Files\Common
Files\Brolin\Java\bcdispatchbcastd.bat”.
7)
Verify that the setup copied the file “systray4j.dll” to “C:\Windows\System32”
folder. Note that registration of the this dll is unnecessary as it self
registering.
8)
Verify that TCP ports 1098-1102 are open (not blocked). The Broadcasting
ports utilize these ports.
9) Run
bulkmail.bat by double clicking on the shortcut. It will take a several
seconds for the BulkMail Broadcasting Service dialog window to open and to
establish a connection to your SMTP server. Verify that SMTP host resolved and
that the SMTP host is “alive”, and that “Service exposed over RMI” by reading
the prompts displayed in this dialog as shown below:

10) Provided BulkMail
Broadcasting Services are alive and the service is exposed over RMI, double
click on bcastd.exe shortcut to run Broadcast Dispatcher.
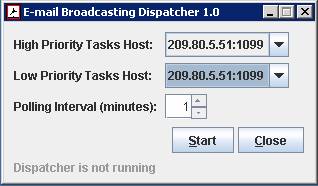
11) Dispatcher uses RMI
discovery to find the BulkMail program. When it finds BuilkMail program it
lists the IP address the server that is running it (your web server), as shown
above. Click Start.
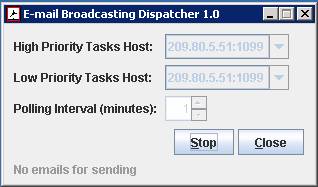
12)
Dispatcher reads the BroadcastingBoard.mdb for unsent email broadcasts
and sends them to the BulkMail program for broadcasting. It also updates the
status of email broadcasts in the BroadcastingBoard.mdb based on status
reported back by the BulkMail program. It repeats this process based on the
value set for Polling Interval.
Schedule nightly utilities
using Windows Scheduler:
The following utilities should
be scheduled to run nightly using the Windows Scheduler. It is recommended to
run them at least 5 minutes apart. Websitesenum.ini is read by the utilities
to determine which websites and MDB to process.
1)
Compact and Repair of MBD. Select Start > Control Panels >
Scheduled Tasks >Add Scheduled Task. Browse and select “C:/ProgramFiles/CommonFiles/Brolin/CompactMDB.exe”
2)
Site Management. Select Start > Control Panels > Scheduled Tasks
>Add Scheduled Task. Browse and select “C:/ProgramFiles/CommonFiles/Brolin/SiteMngt.exe”.
3)
Edit Websitesenum.ini. Open (or if the file does not exist, create it)
“C:/ProgramFiles/CommonFiles/Brolin/Websitesenum.ini” in Notepad and set the
following parameters replacing "d:\Websites\MySite" with your sites
path and “www.mysite.com” with your URL:
[WEBSITES]
Path1="d:\Websites\MySite"
[PRIMARYURL]
1=http://www.mysite.com
4)
Save “C:/ProgramFiles/CommonFiles/Brolin/SiteMngt.exe” and Close
Notepad.
Start MakeZip.exe:
MakeZip.exe is used to zip HTML
files with their corresponding resource folders so they can be downloaded over
HTTP as a single file. This utility should always be running on your
PortalProdigy server. Once it is started it will remain running until you
manually stop it or reboot your server. Be sure to restart it after rebooting
your server.
1)
Locate the file “C:/ProgramFiles/CommonFiles/Brolin/makezip.exe” and
create a shortcut on the desktop. You may also want to add it to your Windows
startup.
2)
Run Makezip.exe by double clicking on the MakeZip.exe shortcut. You can
verify that it is running in Task manager as it does not appear in the system
tray or display a window.
Access your website:
How you access your website is
dependent on whether you have (A) set up a live site with an actual domain name
(e.g. www.portalprodigy.com) or (B)
set up a trial site without a domain name (e.g. http://brock/mywebsite
).
1)
Access your website using Internet Explorer by entering your website’s
URL in the address. For option (A) this is your domain name (e.g. www.portalprodigy.com). For option
(B) this is either the computer name if your website is the default site (e.g. http://brock ), or the computer name plus the website
name if it is not the default site (e.g. http://brock/mywebsite
). We recommend that you first attempt to access your site using Internet
Explorer on the same computer where your site is installed.
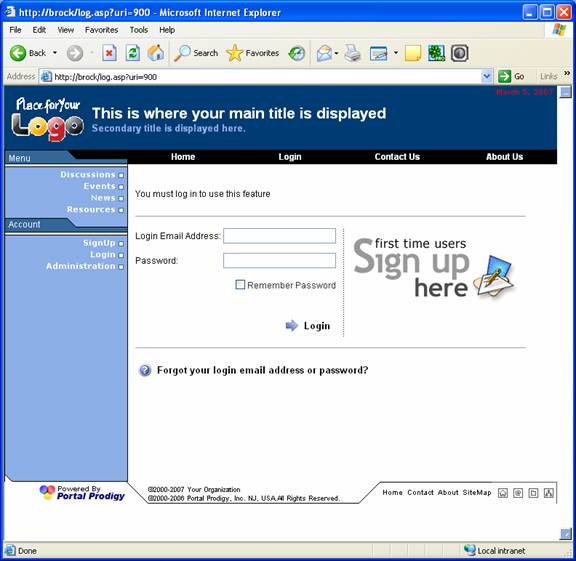
2)
It should appear as follows:
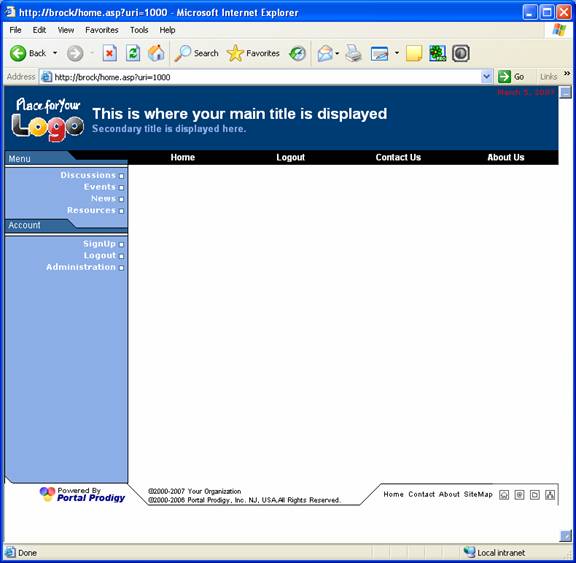
a)
If you get a “Page not found” message or some other error that is not
related to permissions, first recheck your IIS settings. The most common
mistake is for the host header name to not match the Site’s URL that was
entered during the PortalProdigy.exe installation. If you get an error that
refers to permissions or access rights, verify that you have set the Windows folder
and file permissions and the IIS folder permissions correctly. If the Home
Page does not display as shown above, but the URL changes to have “/home.asp?uri=1000&sti=1000”
appended to it, this means the website is running but has encountered a
problem. Again, recheck permissions. If you continue to have problems you can
submit a request for assistance from our website www.portalprodigy.com
3)
Click on “Administration” which is listed in the Left Side Bar.
4)
Set Login = “Administrator”.
5)
Set Password = “newsite” all lower case.
6)
Click “Login” and the Site Administration menu should appear as follows.
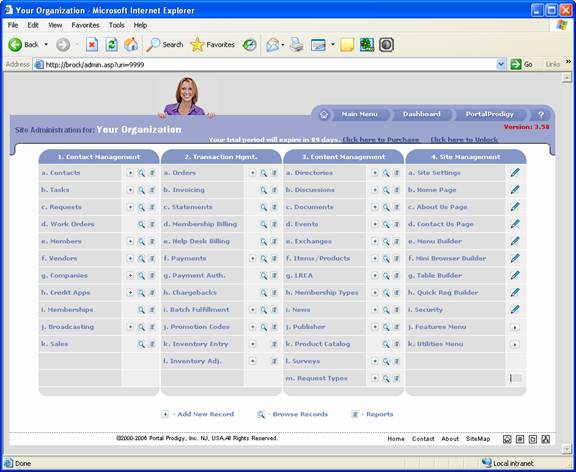
7)
For further instructions see the Administration Manual & User Guide
and the Quick Tutorial Guides which are available on www.portalprodigy.com


